I never, ever dreamed I’d write blog post on distance learning or remote teaching-much less have a need for it myself. But, here I am.
It’s crazy that just last week I couldn’t wait for a break from school. Now I have one, and I’d so sad about it. It’s funny that you don’t totally get the bond you develop with your students until you’re in a position like this.
I’m one of the lucky ones, because I had a day to prep my students for what to expect. At least from a school standpoint. I smiled and faked excitement all day, and most smiled and faked their happiness right back to me. Some were just flat out honest, “Mrs. Swinford, I don’t like this. I want to be at school”.
There was definitely no joy walking out of the classroom. It is not at all like leaving for summer break or Christmas vacation.
In this post:
- Elephant in the Room
- Daily Structure
- Video
- Online Resources for Distance Learning
- Zoom Tutorial
- Using Screencast-O-Matic for Distance Learning
However, I also know that this isn’t the end. It’s a change. A BIG change. Planning for that transition was a bit overwhelming to say the least, because there are so many things to consider. Even with distance learning, it is very important for me to teach purposefully. I don’t want to assign busy work for the sake of students having an assignment to complete. I’ve written multiple blog posts about distance learning and you can use this post as a starting place.
Elephant in the Room
I think it’s essential to not overlook the obvious. Many students will not have access to technology for distance learning. We can’t ignore that.
To determine which students access to technology would be most problematic for, I created a parent survey that provides information about who has access to technology at home. If a parent doesn’t complete the digital survey, I will send home a paper copy. If they don’t return the paper copy, I’ll assume that digital learning isn’t an option.
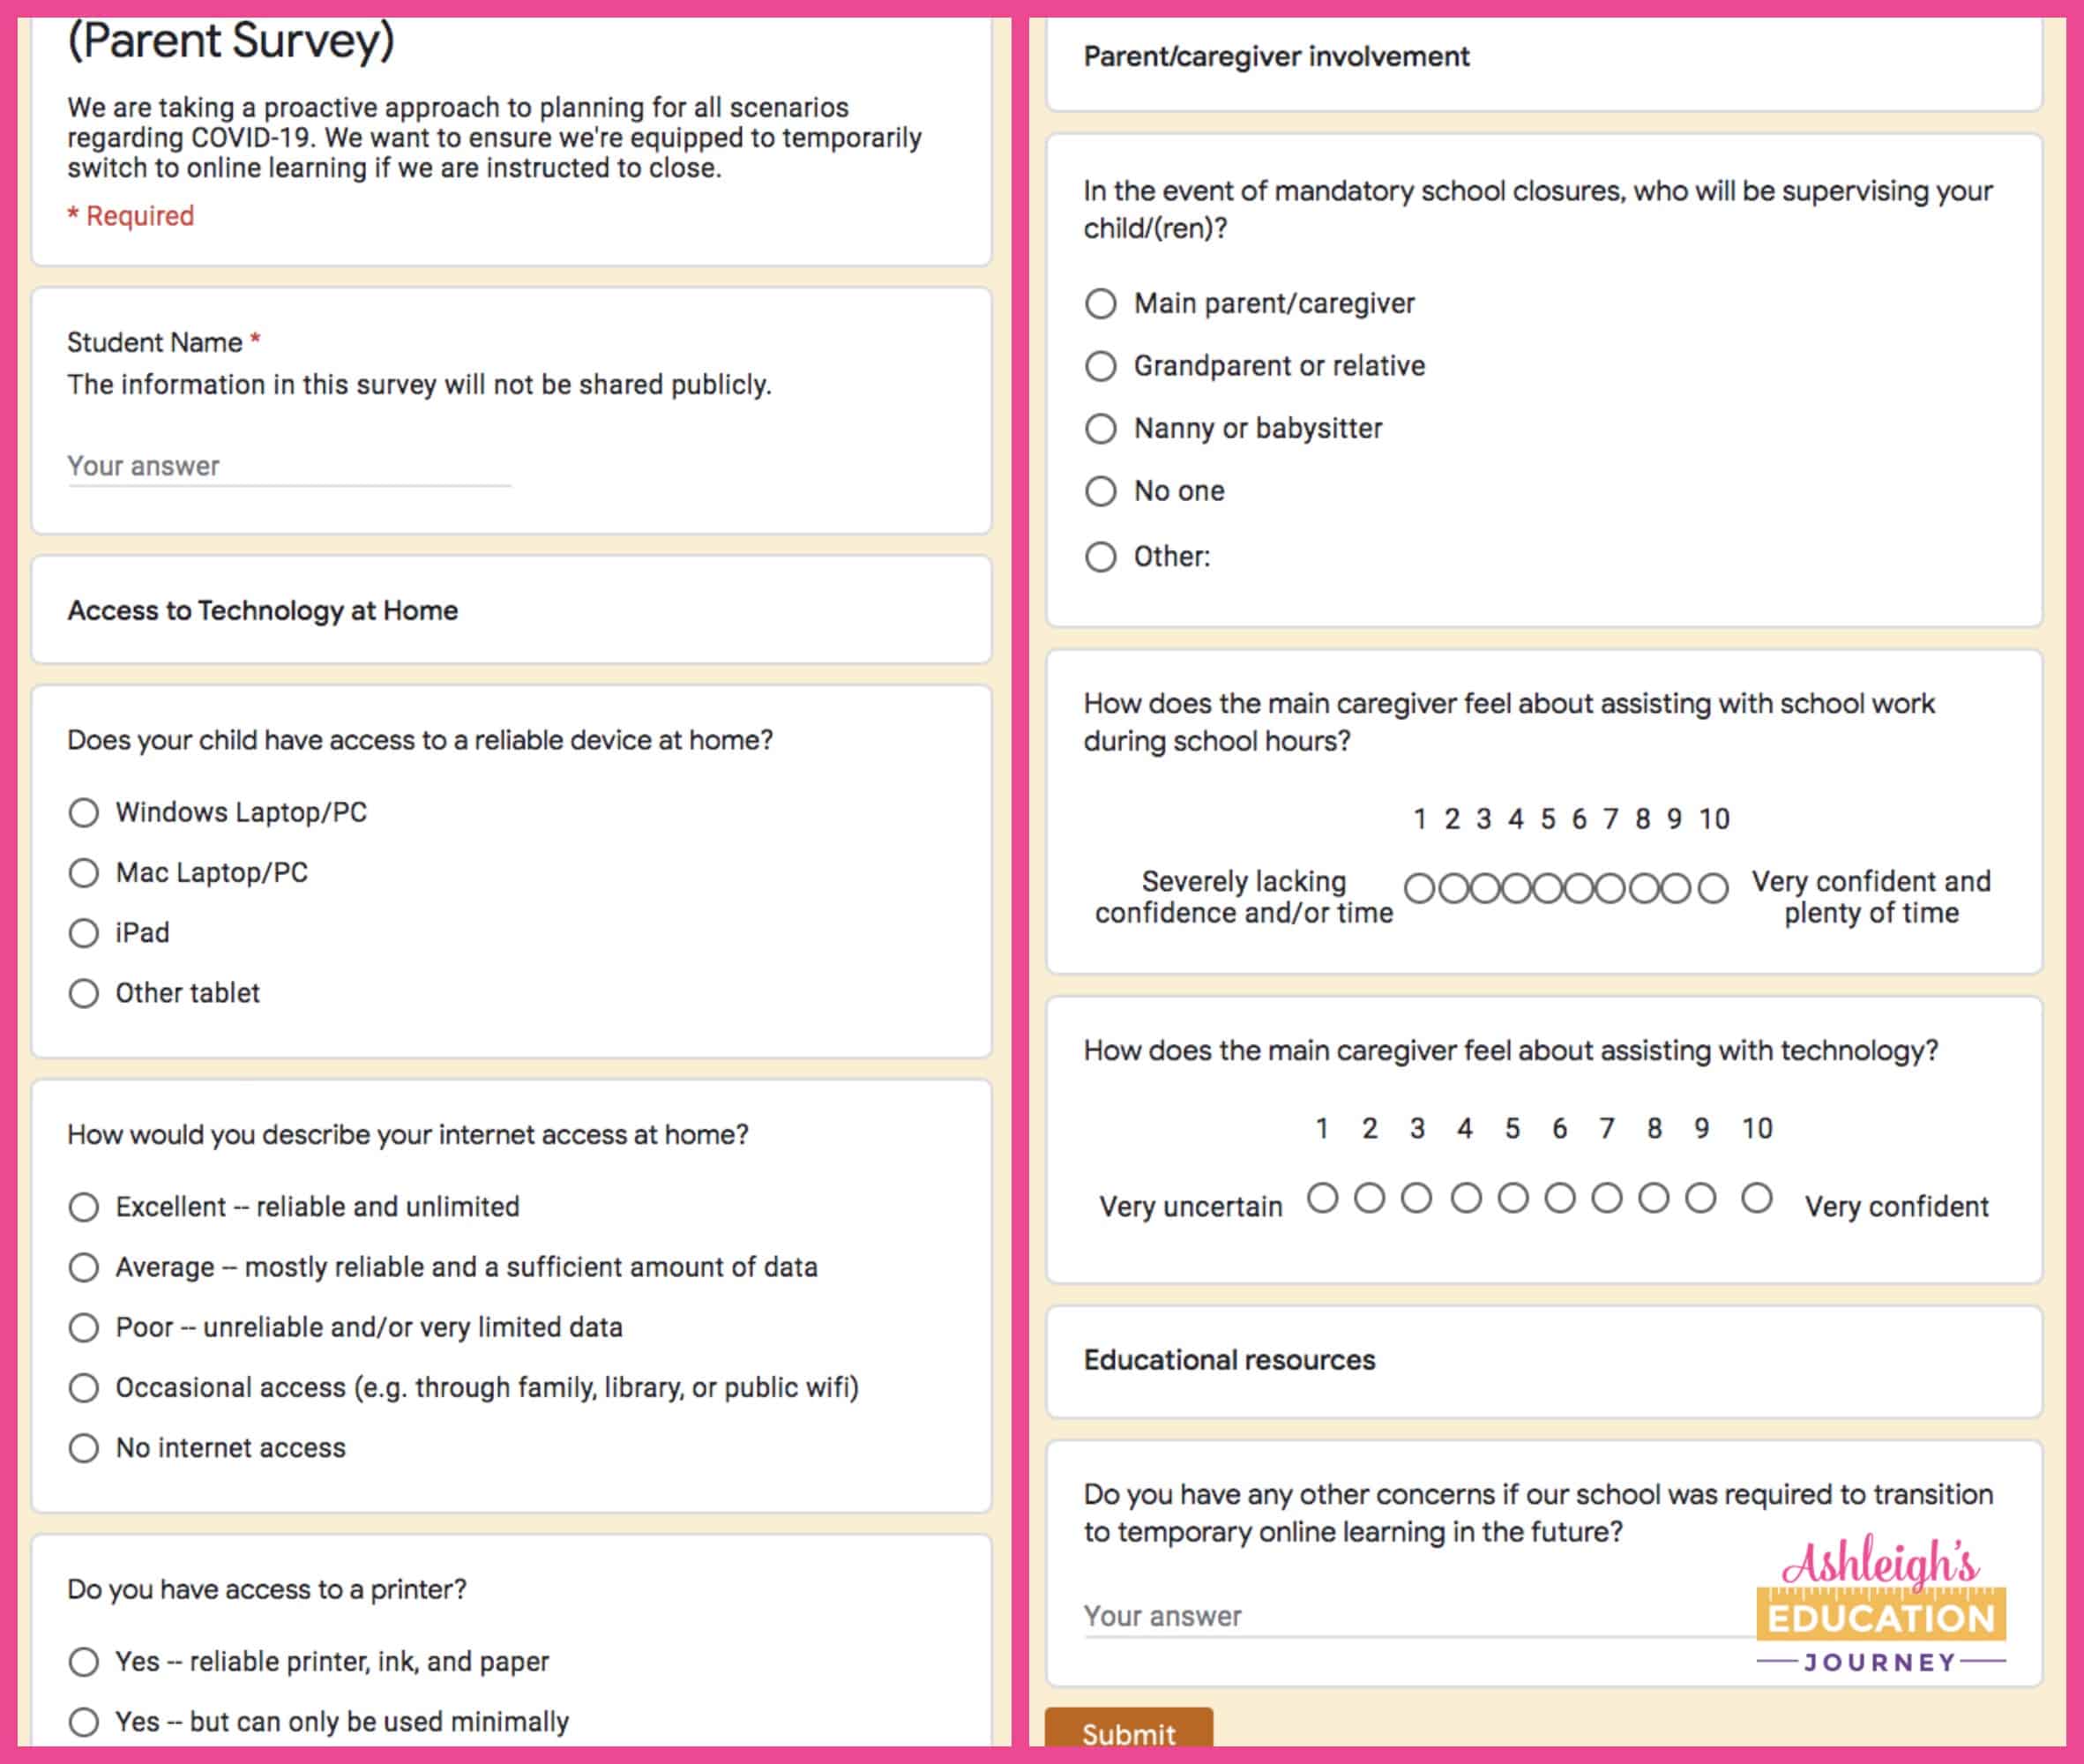
After I get the results from the survey, you can create a plan for students without access to technology. I may leave weekly packets for them to pick up at school or possibly even mail work packets to their home address. No matter what the situation, no student will be penalized for not completing work during this time.
You can download a copy of the survey here. After downloading, you’ll be able to make your own copy and adjust the questions as needed.
Daily Structure
I’m definitely not going to expect my students to follow our classroom schedule. I assure you, if I’m teaching remotely, I will not be getting up at 5:30 each morning. However, I do plan to combine both real-time instruction and student-paced schedules.
Real-Time Instruction
- A whole class video conference at set times during the week (obviously this won’t be mandatory).
- Video conferencing — students can sign up if they want to schedule a conference. This would be a one-on-one conversation.
- Small group video conferences for students with similar needs.
Student Paced Instruction:
- A video introduction or screencast for key lessons. I won’t make a video for every single lesson, but this will always be an option.
- A short welcome video each morning. (We’ll see if I can maintain this.)
- A screencast to offer feedback on student work and progress.
Daily “To Do List”
In addition to the videos, I will give students a daily to-do list. This list looks a lot like a student friendly lesson plan. I did include time-frame suggestions so some students don’t spend too much time working on a particular task.
In the to-do list I link all of the resources such as Read Theory, Moby Max, Studies Weekly, FlipGrid, and Generation Genius. All of the assignments that students will turn in are posted in Google Classroom.
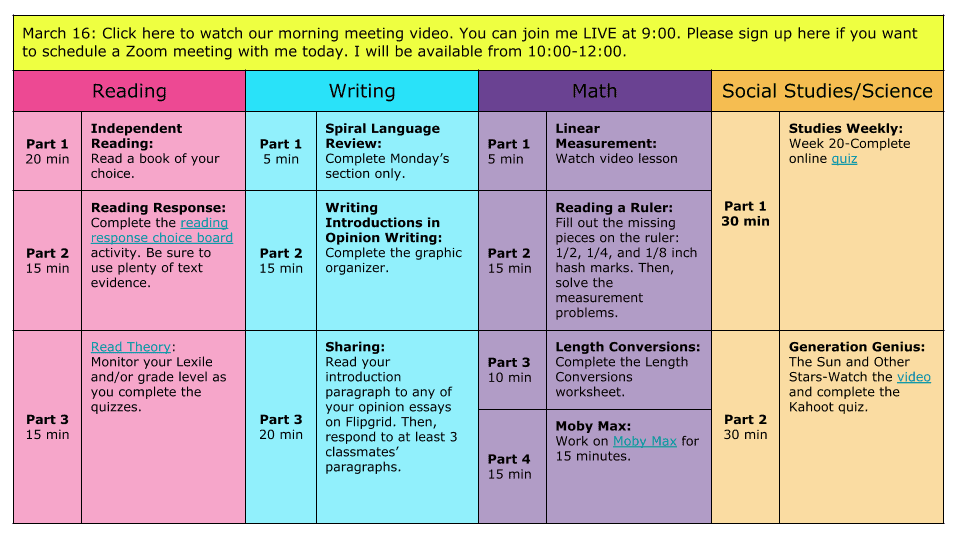
You can download this digital to-do list here. You’ll be able to make your own copy and revise as needed. If you departmentalize, you can also share this with your teammates. Having all expectations on one document will be much easier for students.
This means you can still use your favorite resources! Anytime I create a digital version of one of my resources, I add it to the original product at no extra cost to you. During this time, if you need a digital or editable version of any of my resources please let me know. I know that this transition can be challenging, so I want to be as helpful as possible. You can see my resources here.
Home-Base
I’ve seen SO MANY wonderful resources recommended for distance learning. However, I do want to proceed with caution. We don’t need a hundred different resources. Less can be more. Try to stick with tools and resources your students are already familiar with.
Online Platform
It’s important for students to have a home base or a starting point. We will be using Google Classroom. Our students are already very familiar with Google Classroom, so this is the easy part for us. If you haven’t used Google Classroom before and would like to learn more, here’s a great starting place.
I did want to point out that you can schedule your assignments for certain dates. That may prevent students from trying to cram all of the work they submit in the course of a day or two. But, you will have the capability to assign a week’s worth of assignments at a time.
Your students’ Google Classroom homepage will look something like this. In each assignment, you can add a link to a website, load a Google Drive file, or even add an attachment that can be printed at home.
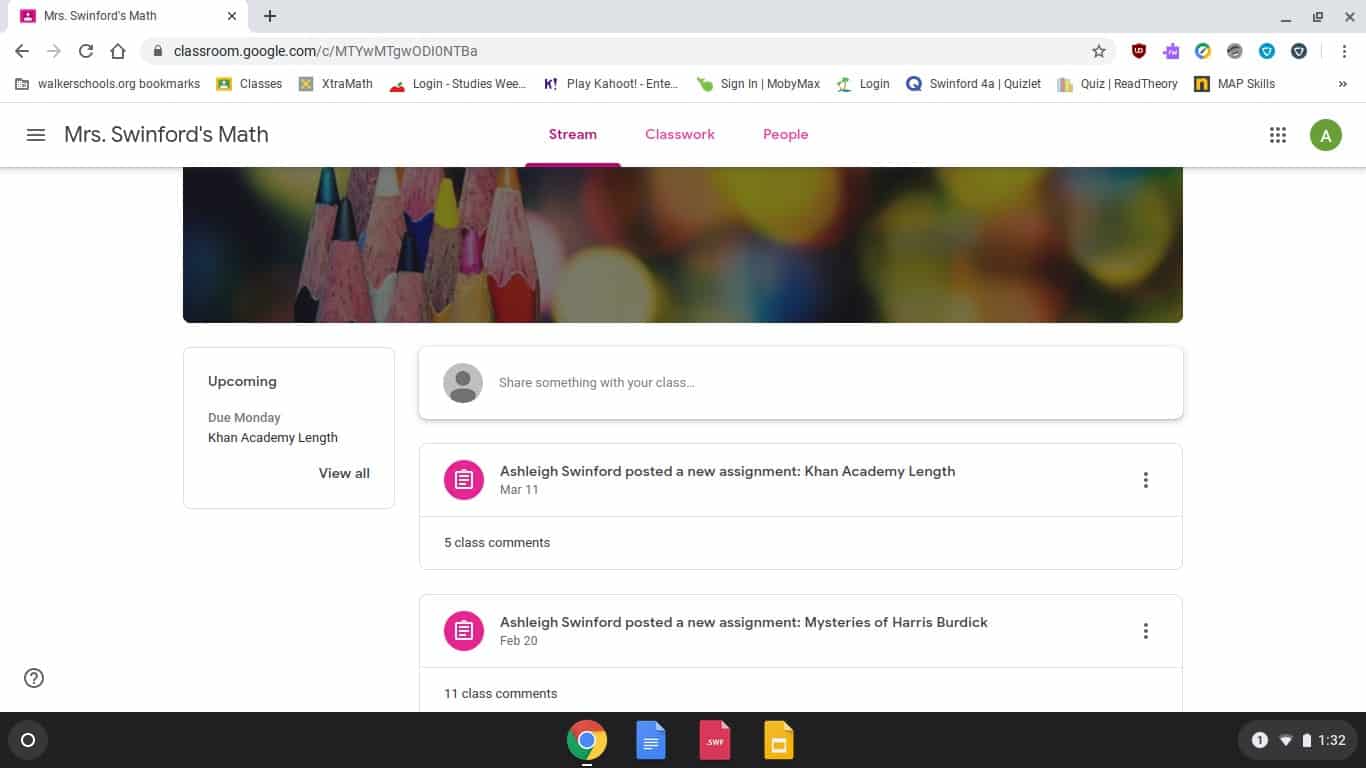
Students can also submit assignments and mark assignments such as watching a video complete. This will help them stay organized and on-track.
Video
There are few things I dislike more than being on video. I feel so awkward! I never like the way I look or sound, and I get nervous and stumble over my words. But, I know that my presence as my students’ teacher is important. I have to learn to relax, and I’m sure that it will get easier and easier with time and a little practice.
Live Video
There are many tools out there that allow you to connect with students via video. Two of the most popular video-conferencing options are Zoom and Google Hangouts Meet. I plan to post the link to any conference calls on Google Classroom, and students will sign in to the call at the specified time using any device. The live video will be recorded so students who are unable to attend can view the video at a later time. In the live videos, we can share our screens and all participants can talk and participate. You can even include breakout rooms on Zoom.
My students about lost their minds when I showed them what a Zoom call would look like. I *may* have been home for two hours before I had my first student invitation to Zoom. If you want to learn more about Zoom, scroll to the bottom of this post. I’ve included a detailed tutorial.
Recorded Video
One benefit of live video is that there is no redo. Whenever I make recorded videos, I find myself redoing the video again, and again, and again. As we do this, we have to remember that our videos are for our students and absolutely do not need to be perfect. My favorite resource for recorded video is Screencast-O-matic. I’ll use this to go over things that don’t necessarily need to be live. I love that I can save and reuse these videos on an as-needed basis.
I record all of my videos either on my laptop or my phone. You definitely don’t need any fancy equipment. I also keep everything short and sweet. I’ve also included a brief tutorial of this resource at the bottom of the post. It’s seriously SO easy!
Online Resources for Distance Learning
I will be linking these resources in students’ to-do list. I’m going to focus on my least essential standards while we’re out, but I think these resources will be fun and interesting for students.
Kahoot!
There are few things my students love more than Kahoot! quizzes. Thanks to some incredible innovations, we are now able to place LIVE or SELF-PACED games remotely! I linked the remote learning starter kit.
BrainPOP
These short educational videos are fantastic for online learning. This is currently free for educators affected by coronavirus school closures.
Flip (Formerly Flipgrid)
Create grids to facilitate student led video discussions. This tool is totally free. I’ve written a tutorial on getting start with Flip here.
Khan Academy
These instruction videos are perfect for our math lessons. This is a bit more procedural than I like, but I’m at that point in my curriculum where the essentials have already been taught for deep understanding.
Moby Max
I like this online learning program for math because it pinpoints gaps and it individualized instruction based on those gaps.
Read Theory
This is a free reading comprehension program. It’s not perfect, but it’s good for reading comprehension. My students really enjoy it too.
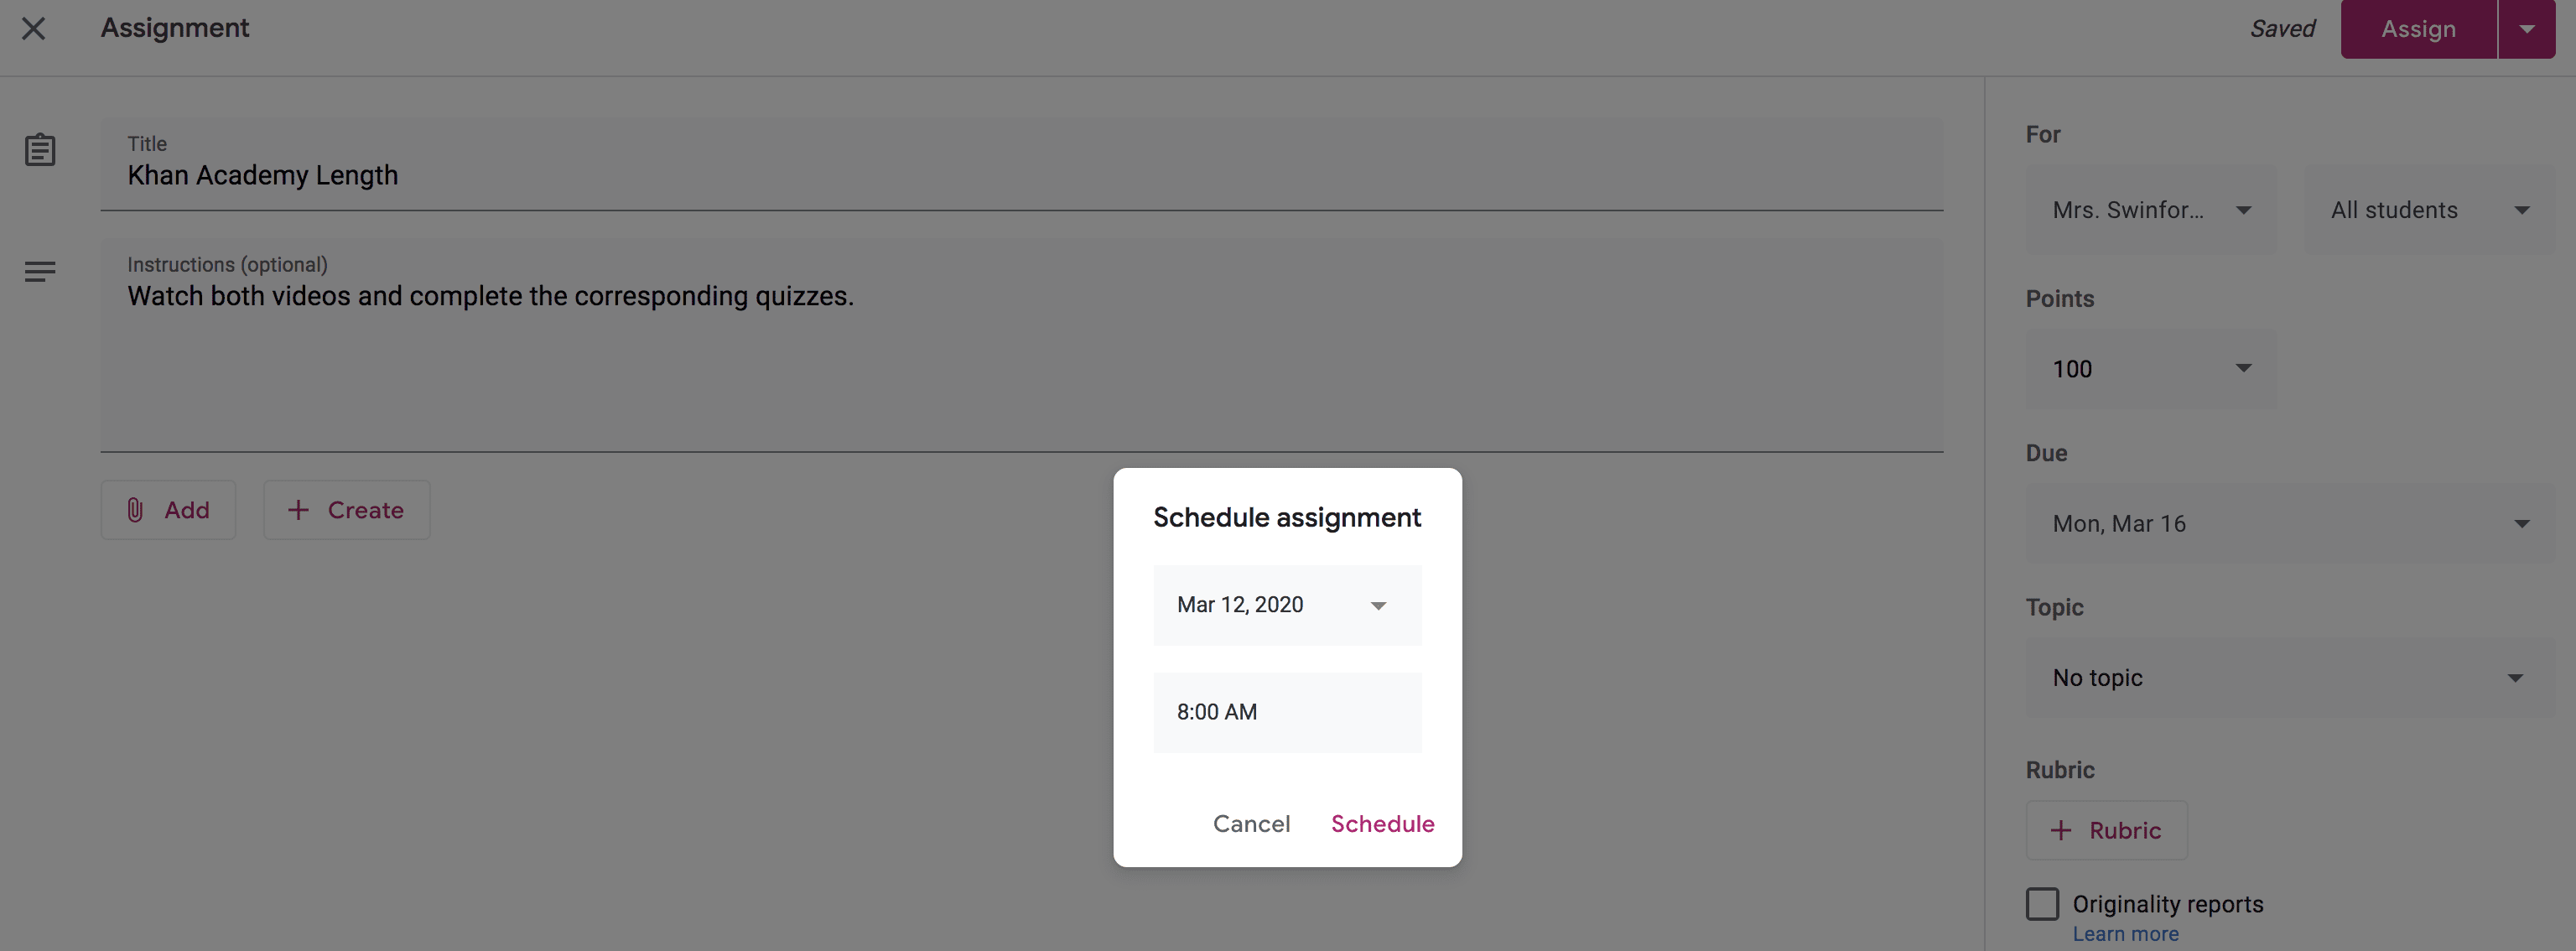
Zoom Tutorial
You’ll first need to sign up for an account, which can be done in less than a minute. Once you set up your account, you’re ready to schedule a meeting.
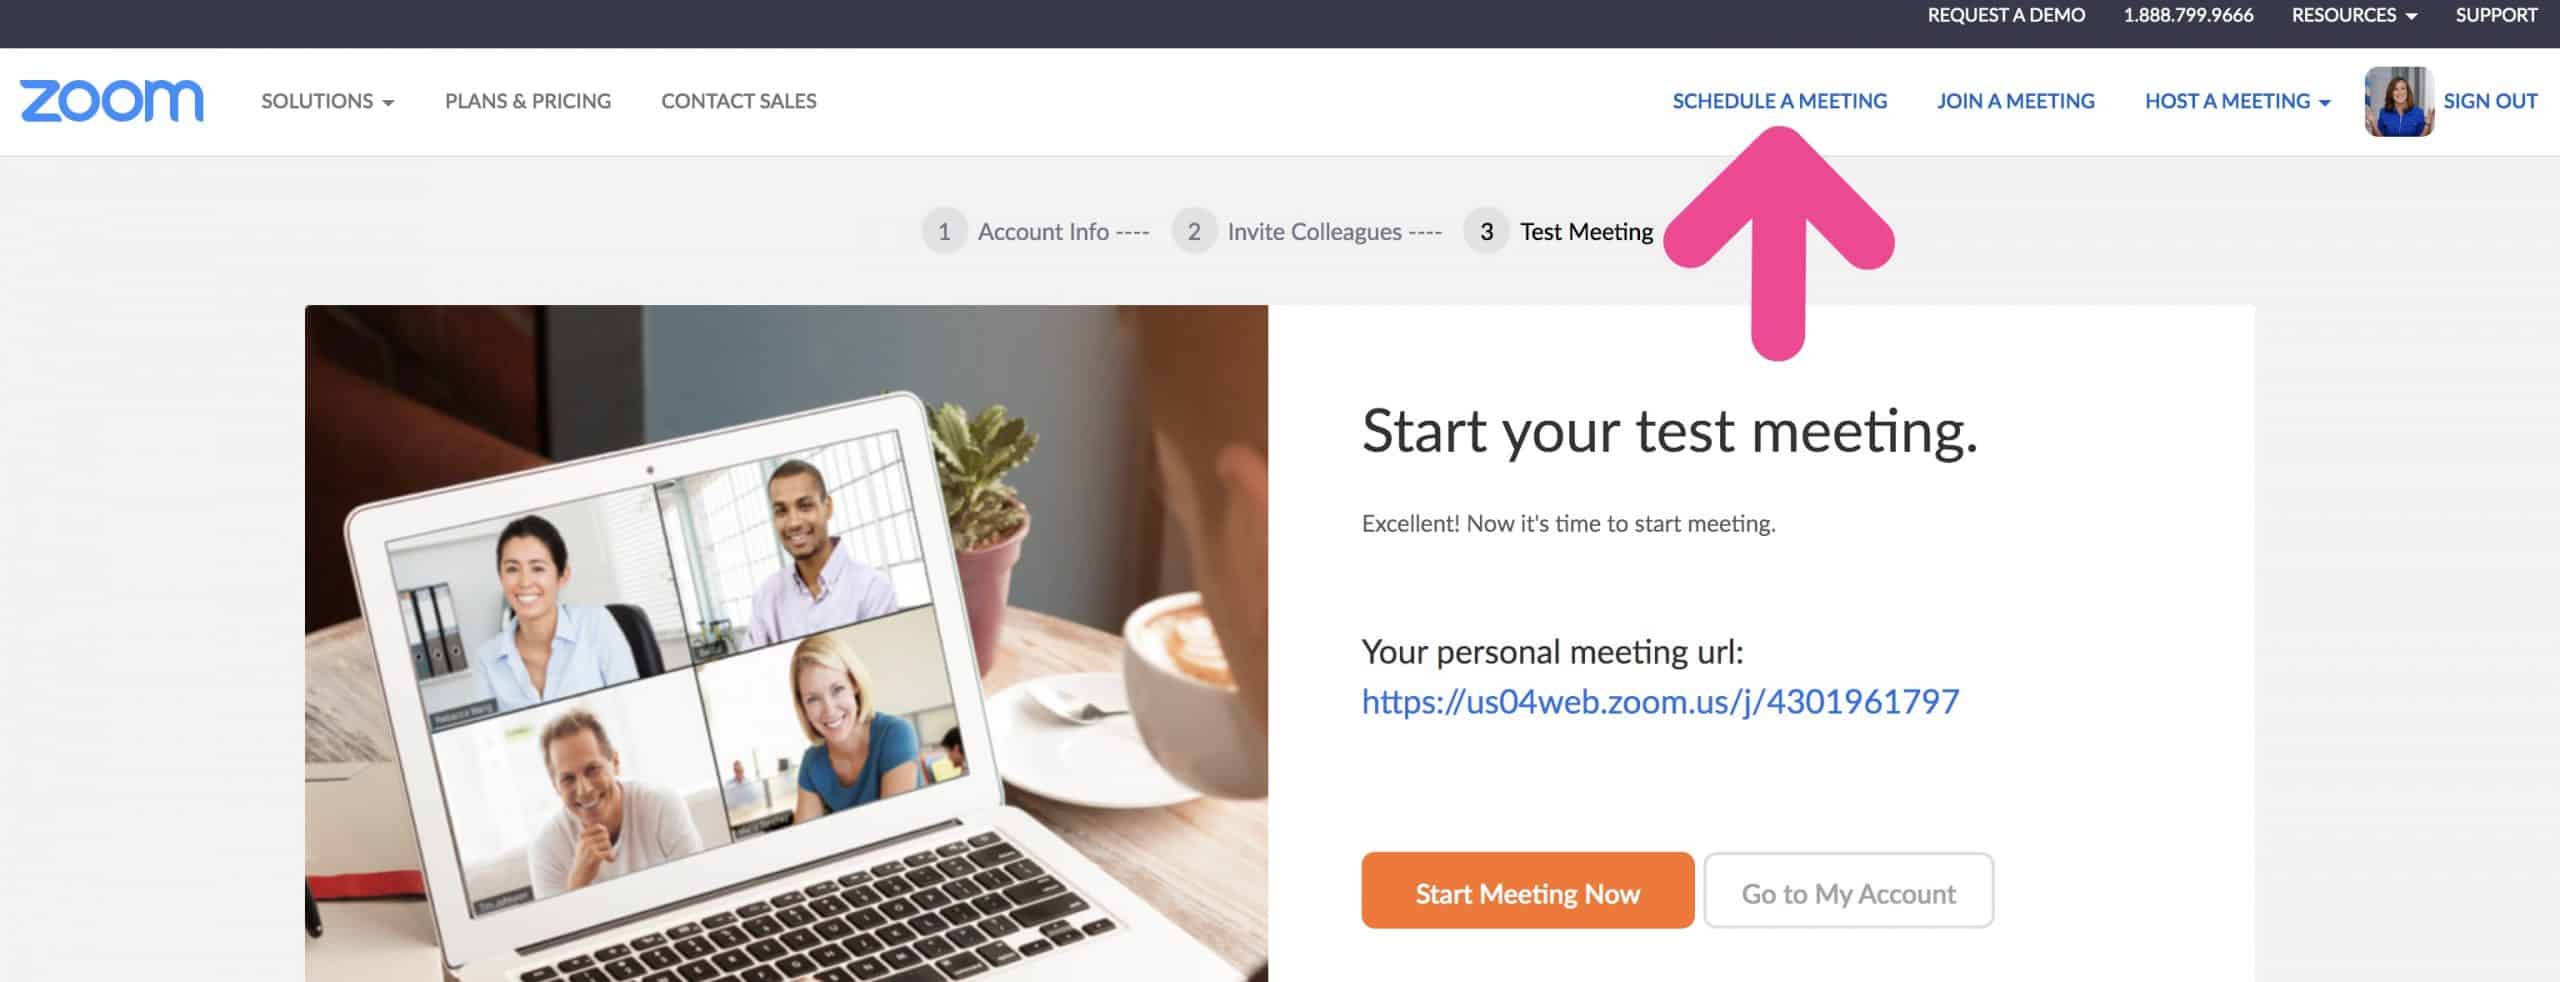
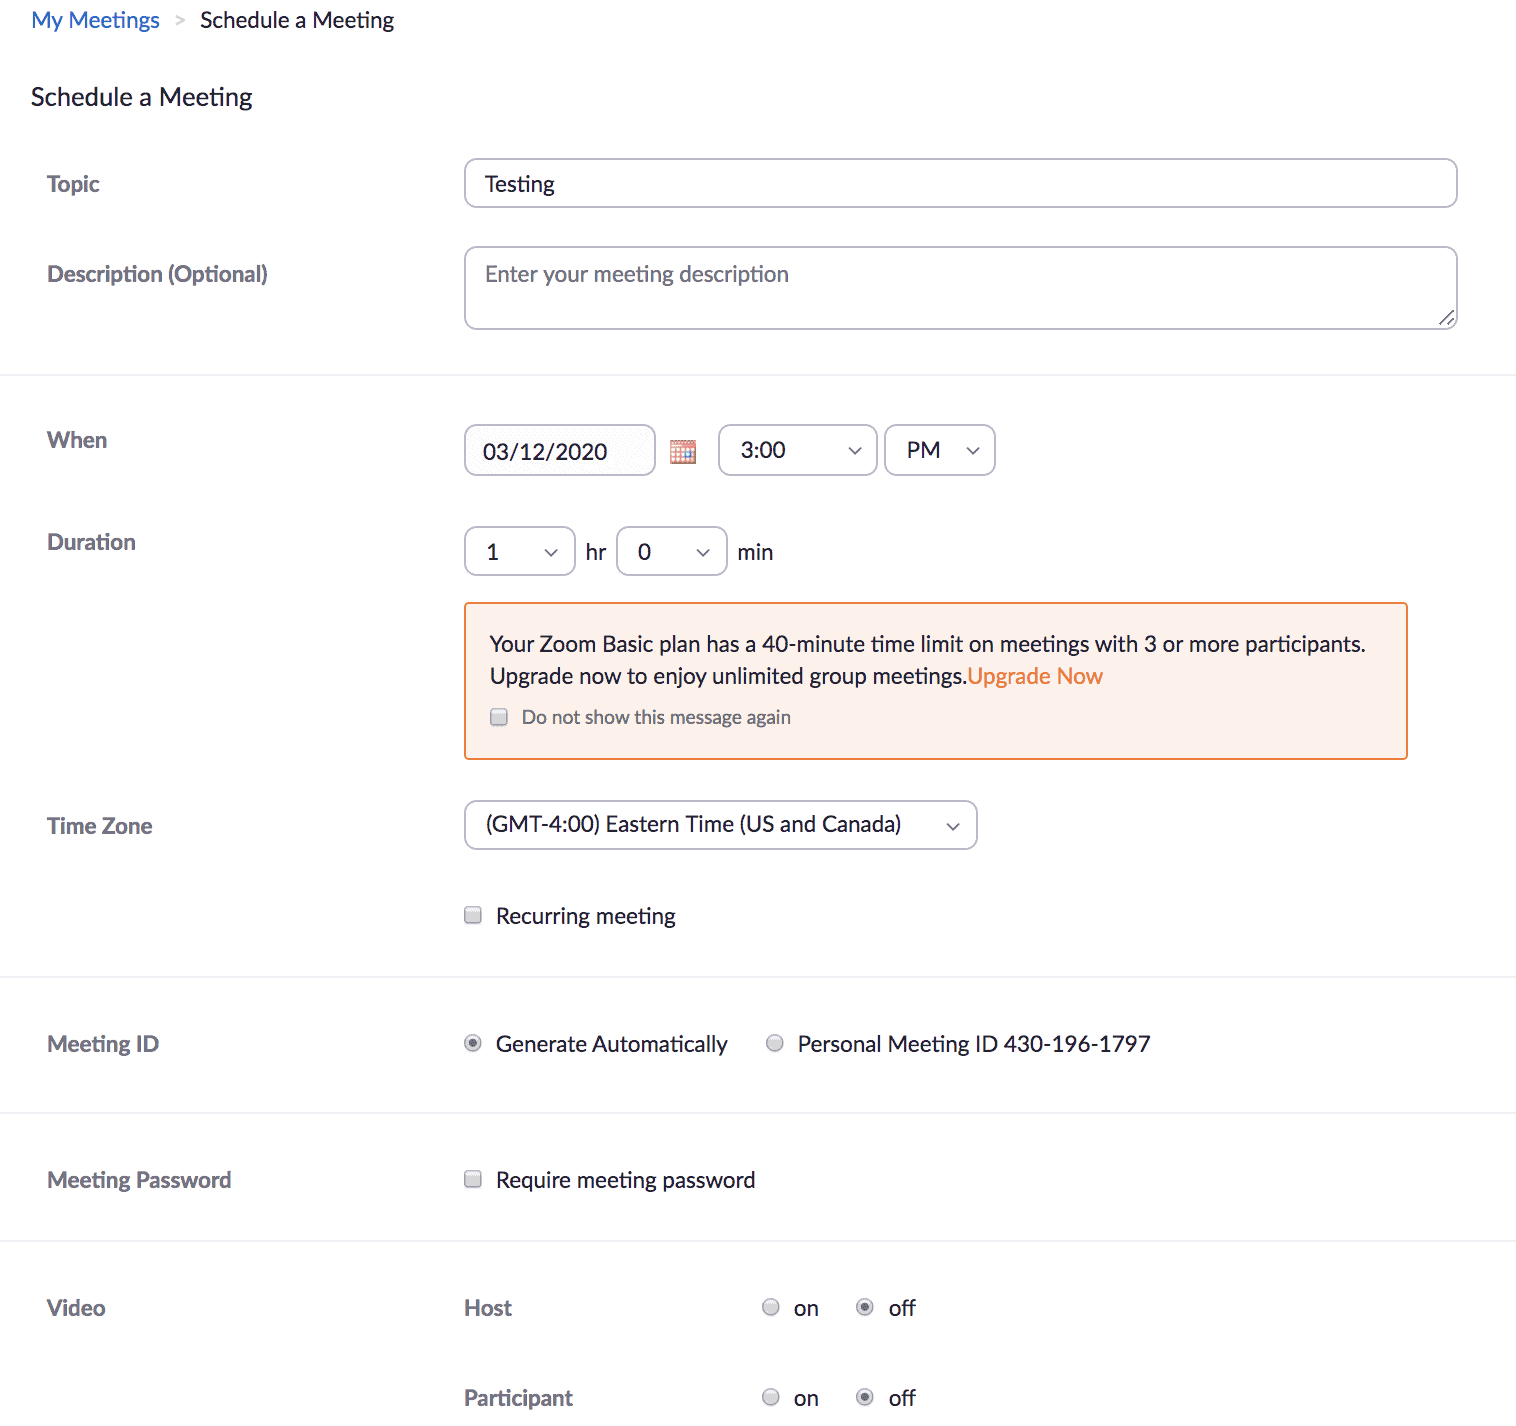
You’ll give your meeting a name and decide when to meet. I go ahead and turn my (host) video and camera on. I’ll wait and see on whether or not I want to turn my students’ video on.
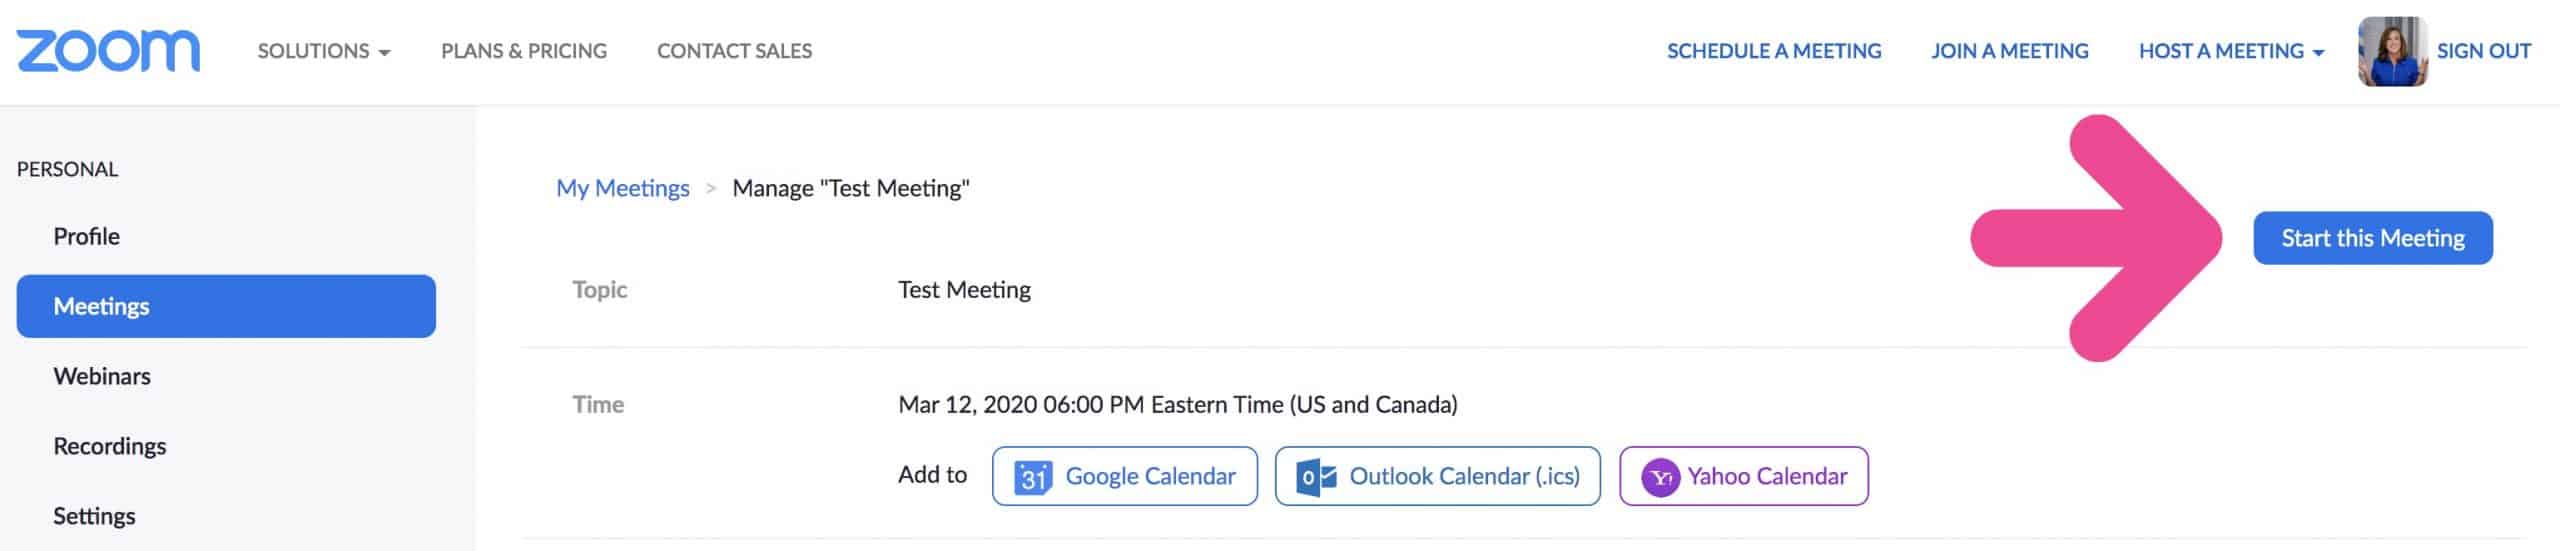
When you’re ready to go, you just click “Start Meeting”. You can start your meeting before the official meeting time.
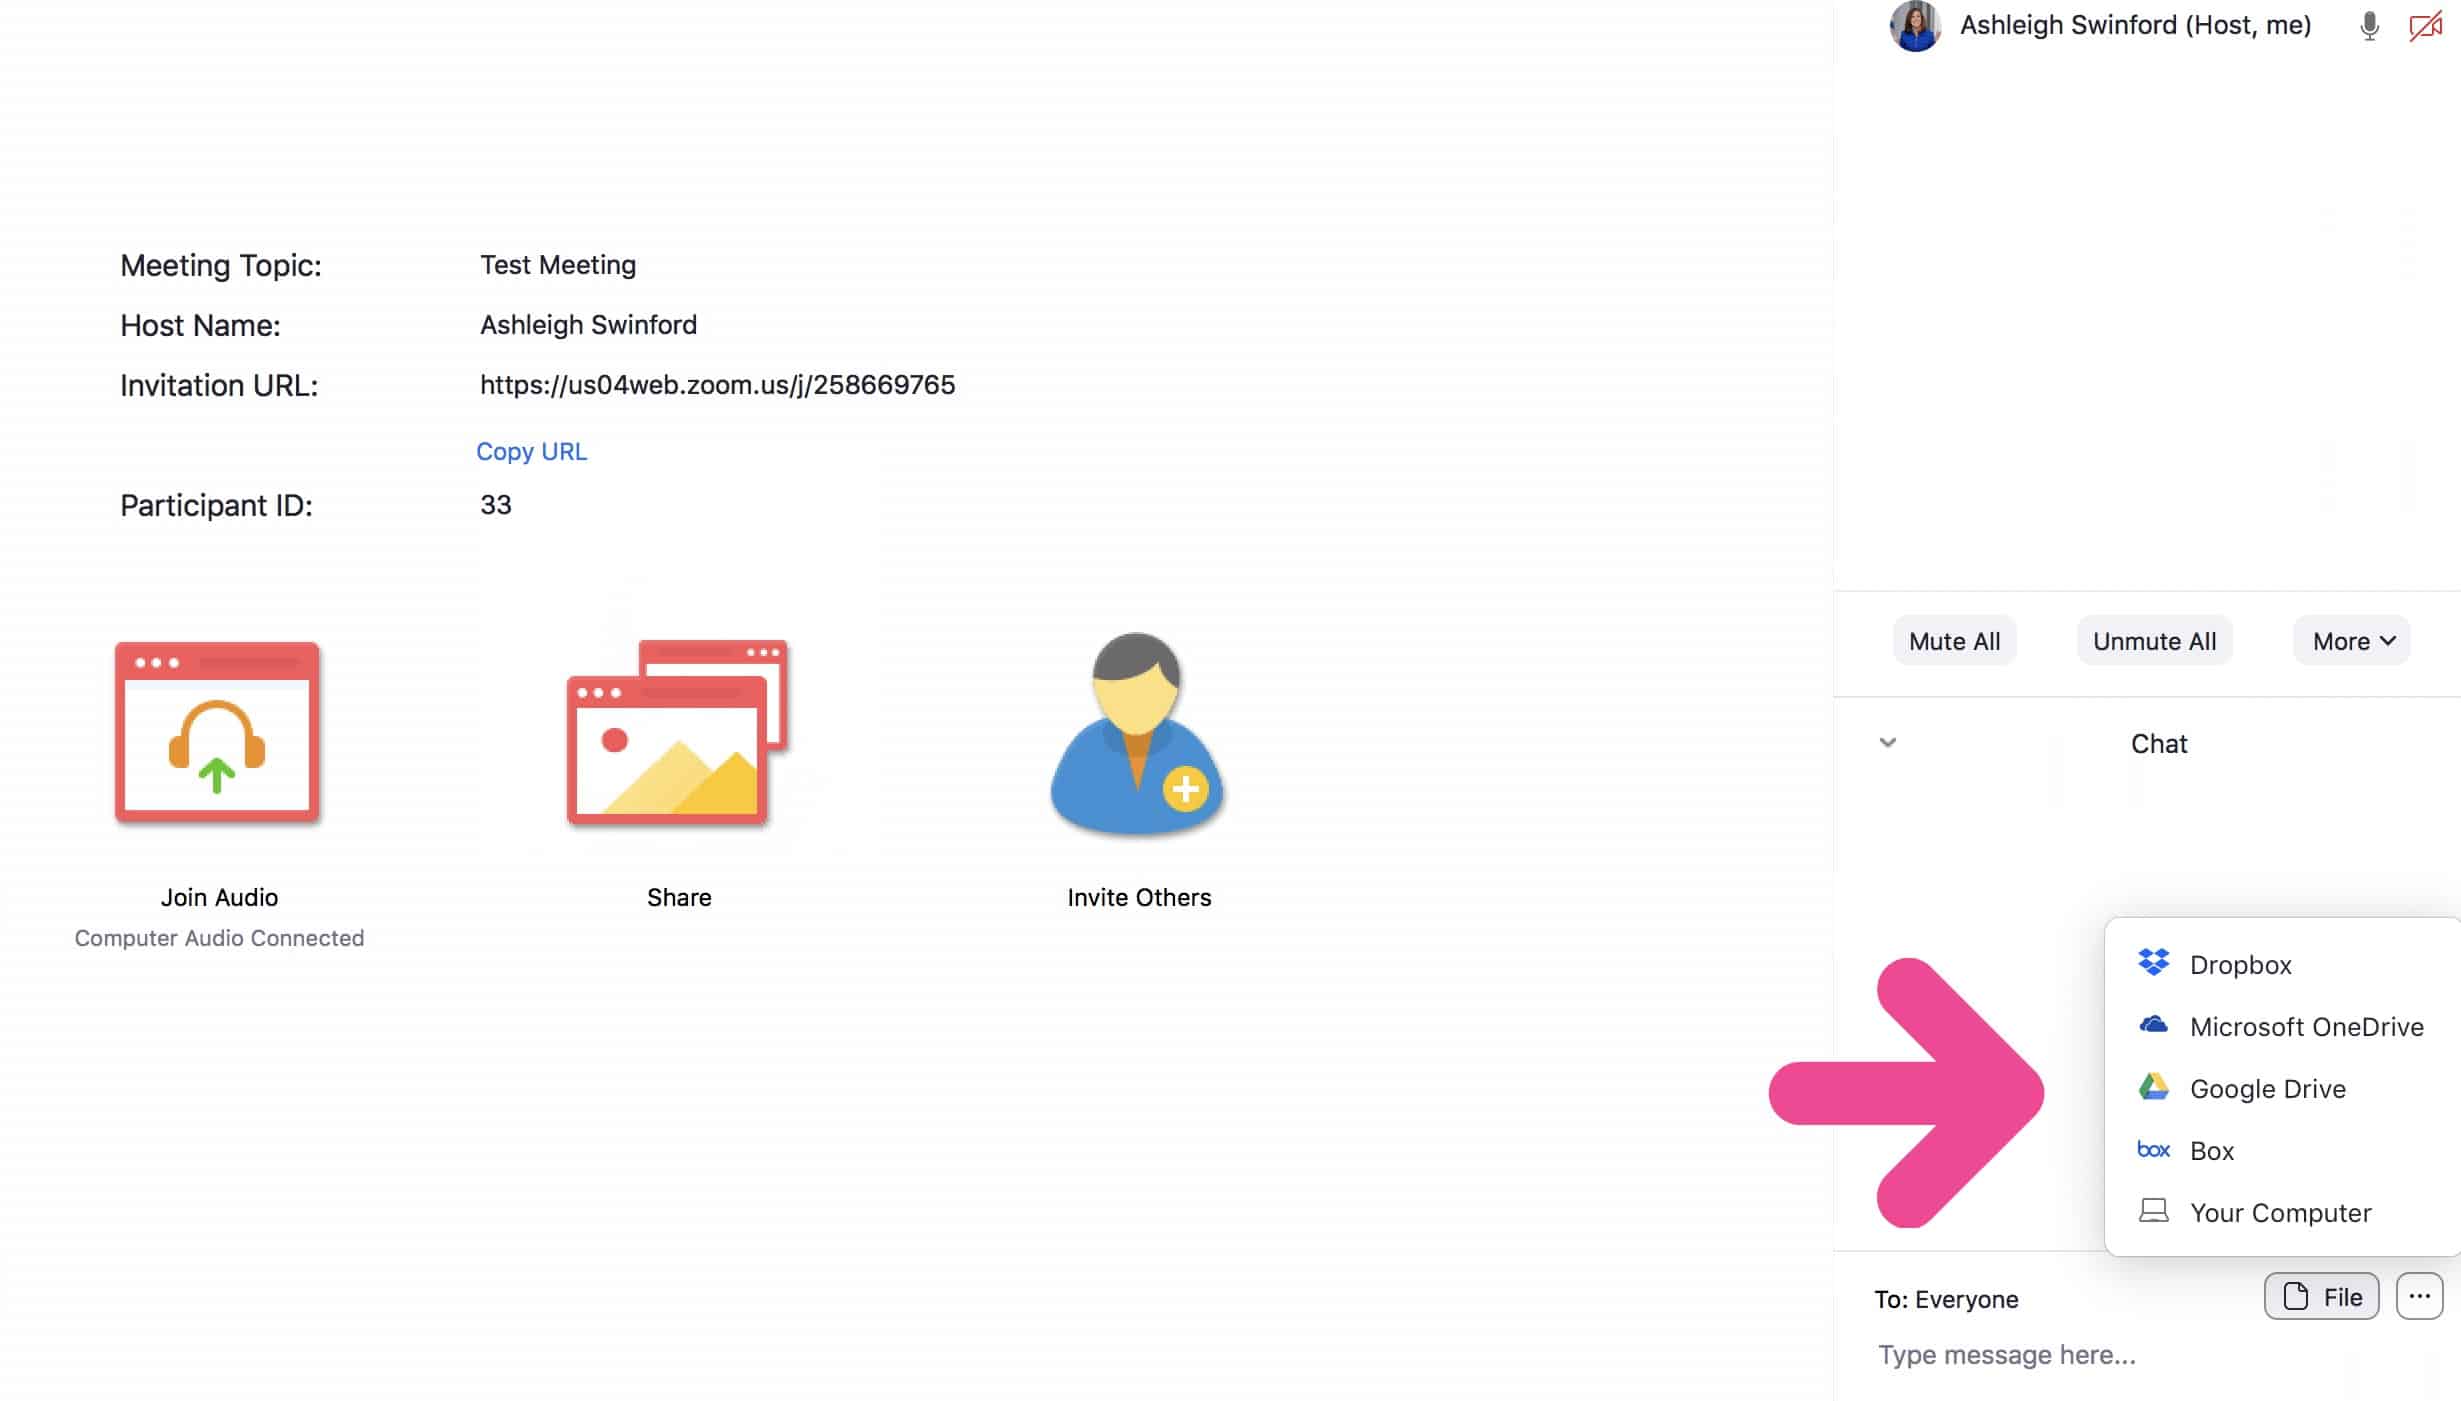
All of your meeting controls are at the bottom of the page. You can mute yourself or turn your video off. You can also mute and unmute individual students or all students at one time.
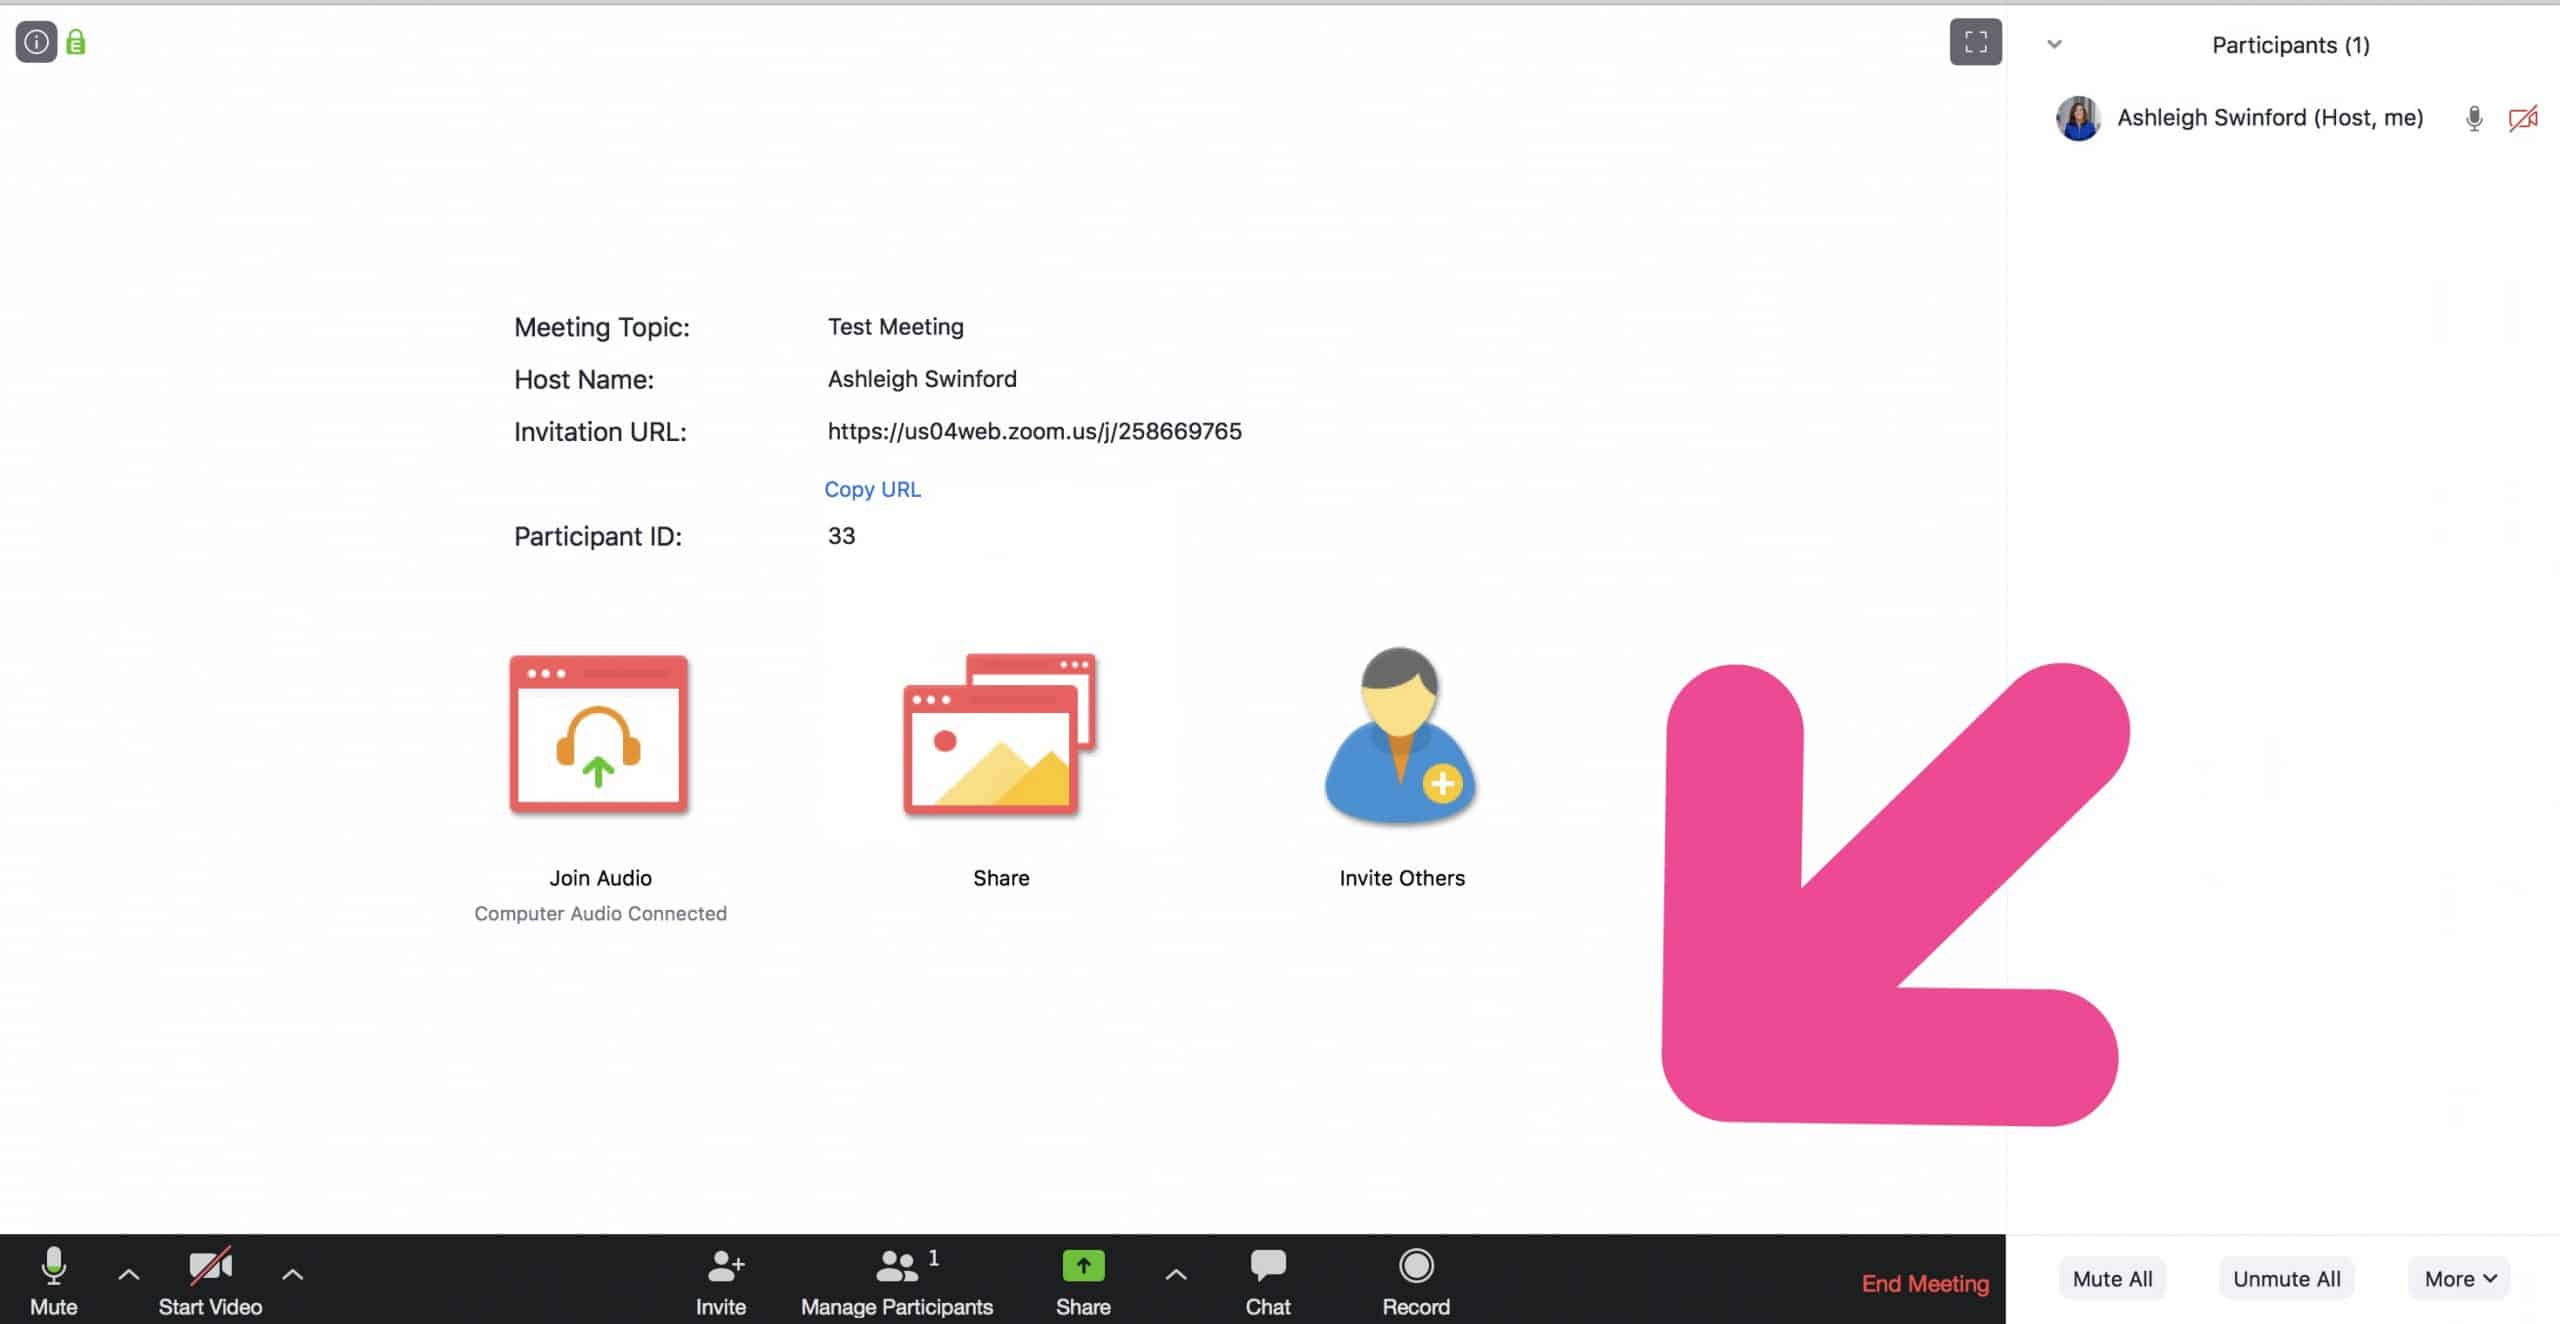
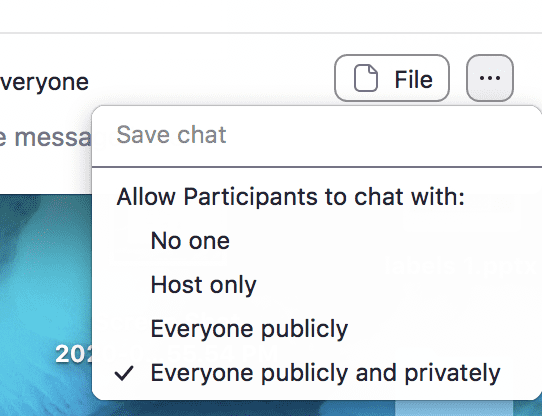
I highly recommend turning off the chat feature, or making so students can only chat with you. That was the first thing my students noticed, and it was highly distracting.
You can also share a file with students. For example, if you’re going over a math task, you could share a printable image with all students.
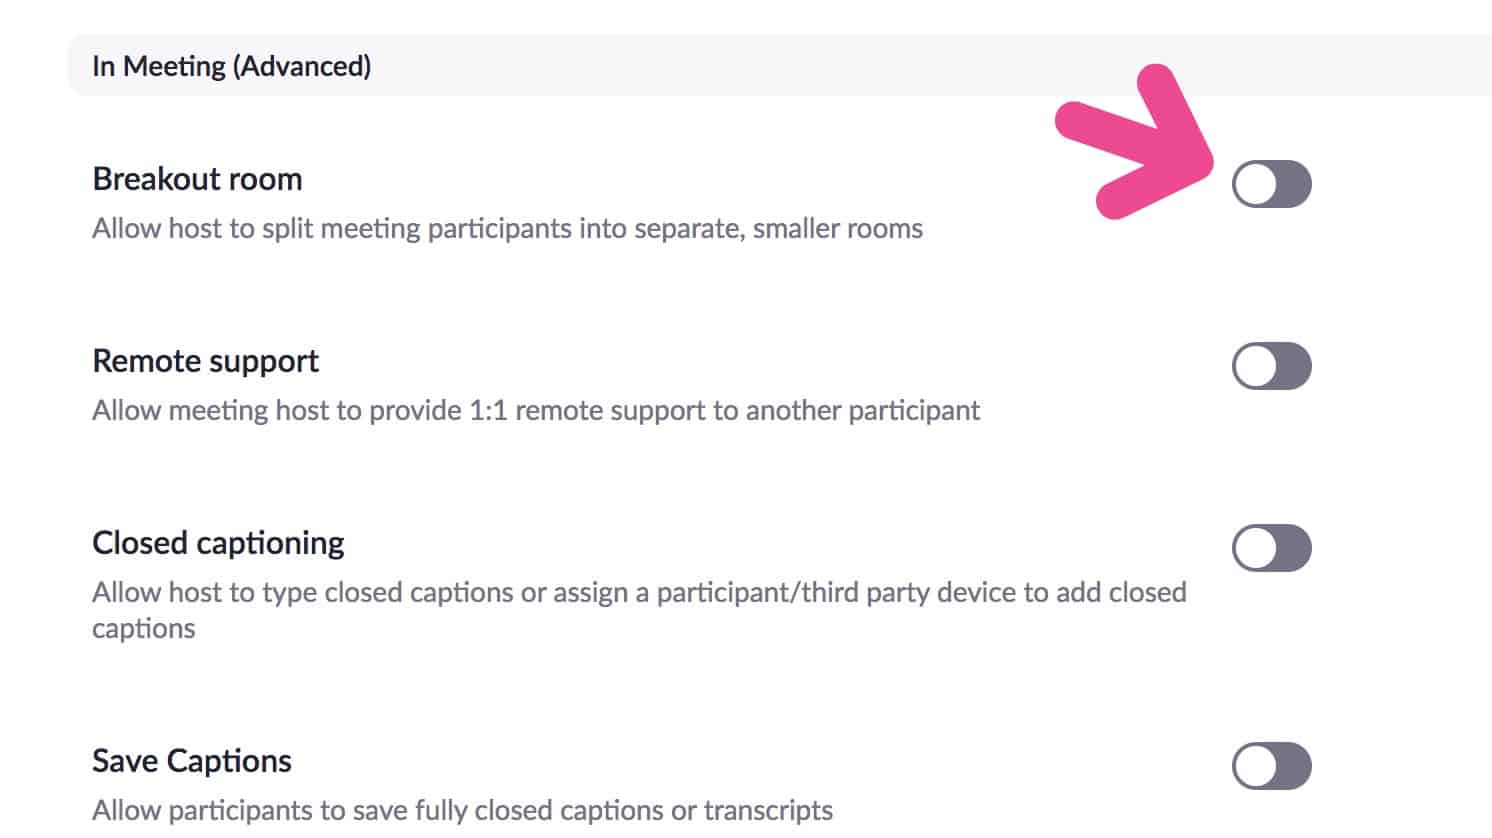
If you’re feeling especially fancy, you can have video breakout rooms. It sounds complicated, but it’s surprisingly easy. You’ll first go to “settings”.

Then, scroll way down until you get to “Breakout room”. You should click the circle, and it will turn green. Whenever you start a new session, you’ll now be able to use a Breakout room.
You can manage Breakout rooms with the icon shown below. The pop-up box will open and you can decide how many rooms you want. You can also decide if you want to manually assign groups or if you want Zoom to automatically assign the groups.
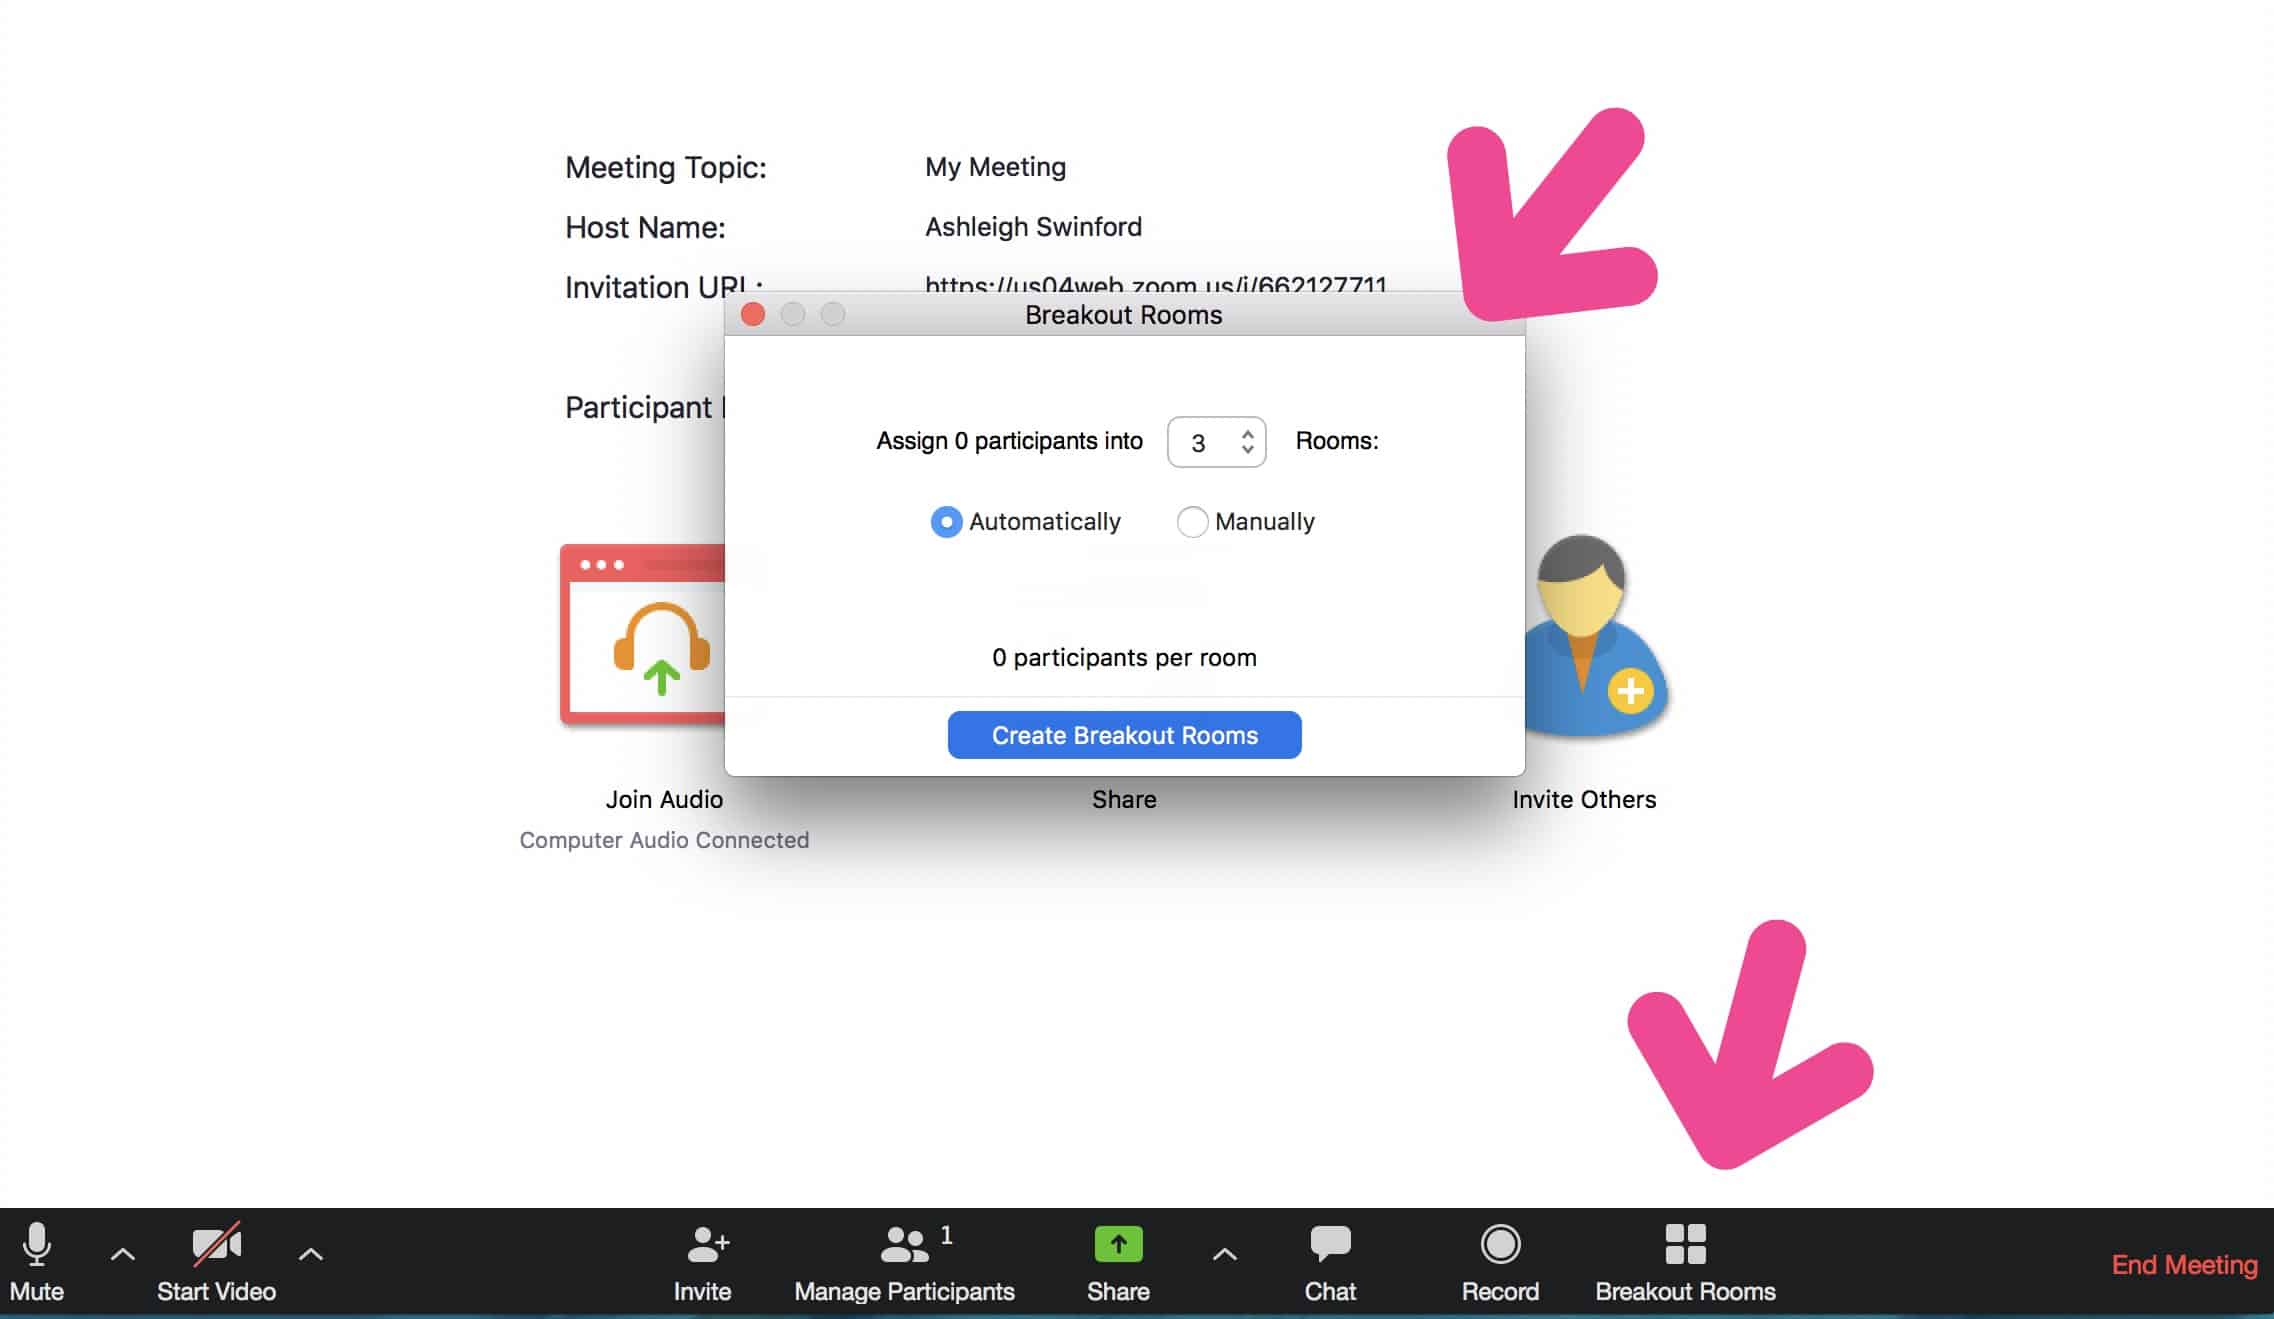
You can rename the rooms, add students in rooms, move students to different groups-you name it! When you press start, students will receive a pop-up message and will be taken to their Breakout group.
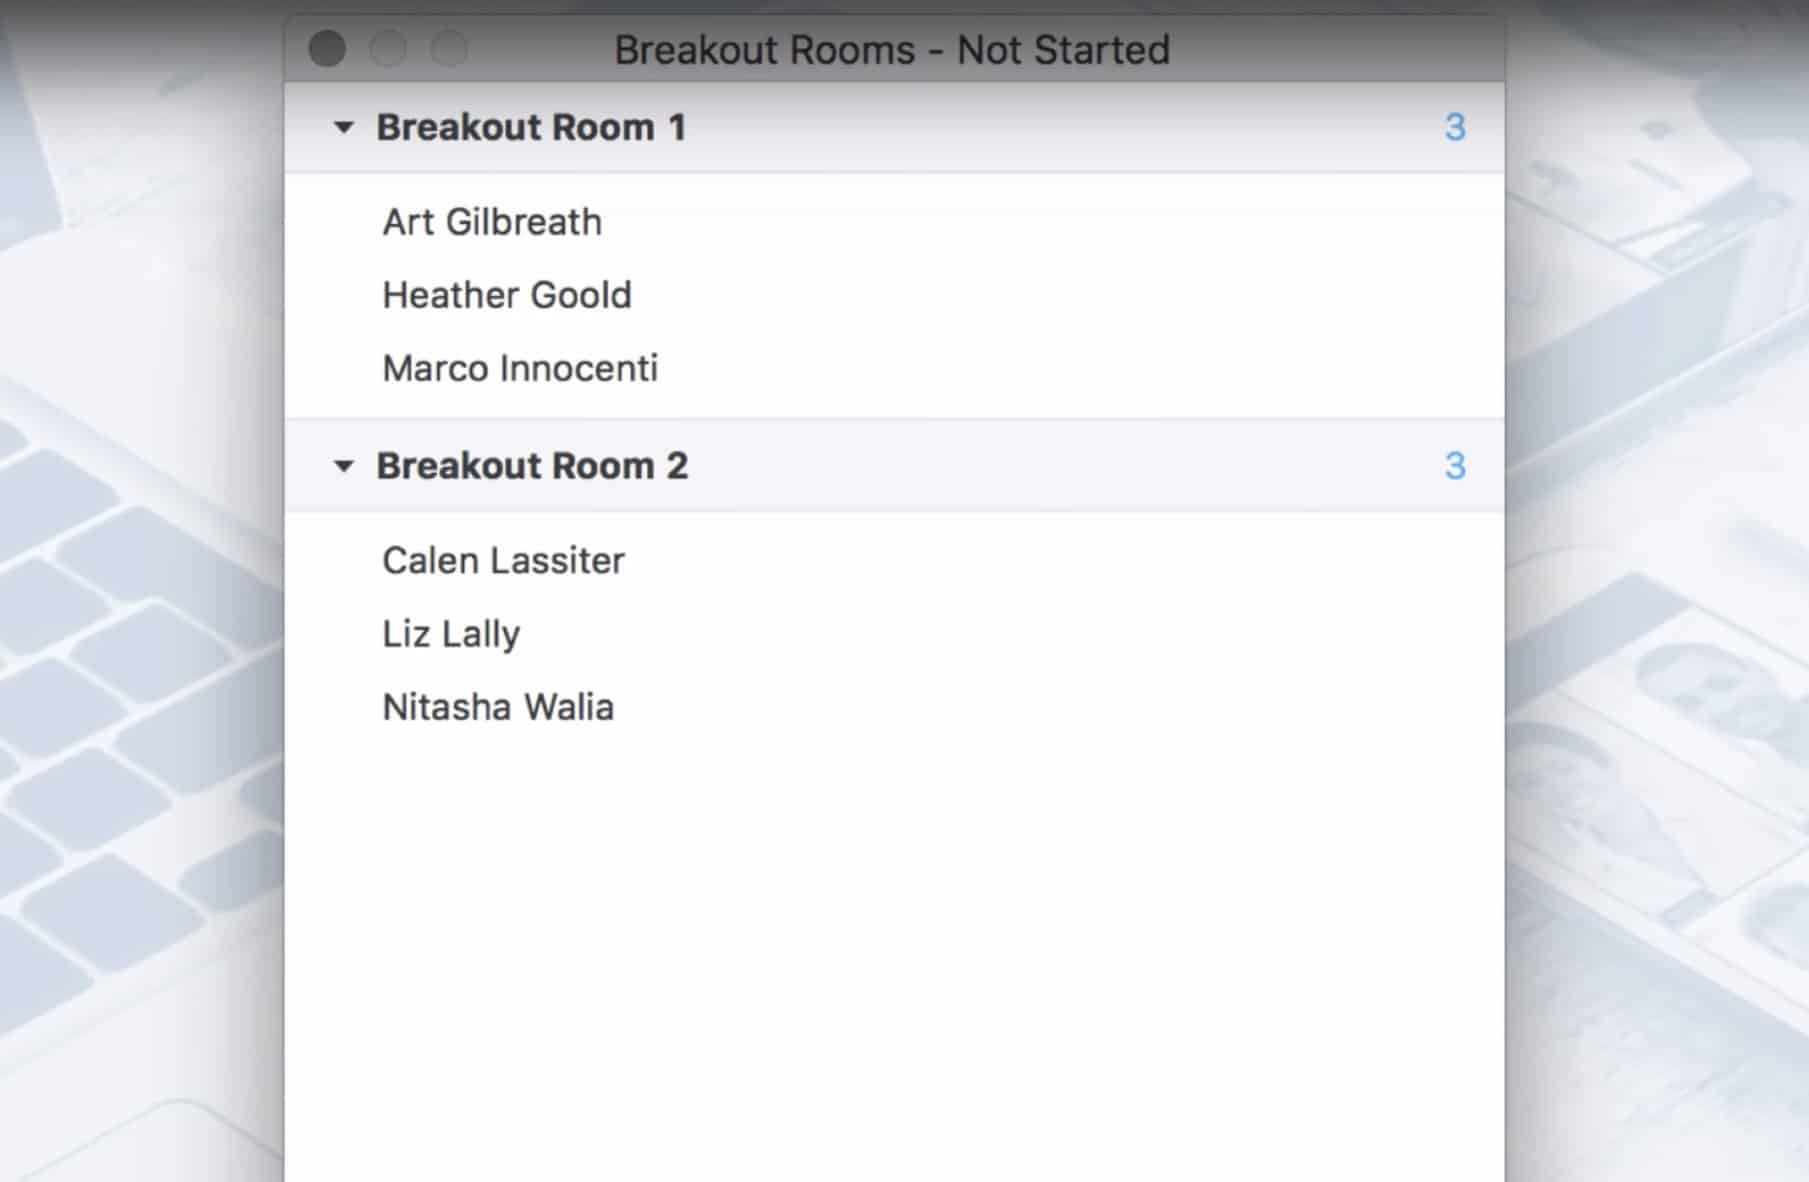
You can move from group to group, as well as post notifications for all groups. It is all extremely user friendly. It’s sounds like it should be really complicated, but it’s not.
For students to join a meeting, they click on the link in Google Classroom. If it’s the first time Zoom has ever been used on that device, it will give students step-by-step directions on what to do. If students have already used Zoom, they’ll go directly to your “meeting”.
Using Screencast-O-Matic for Distance Learning
This is another free resource that you can upgrade. I don’t typically spring for the upgrade, but this price is not too bad!
You should first “Launch Free Recorder”.
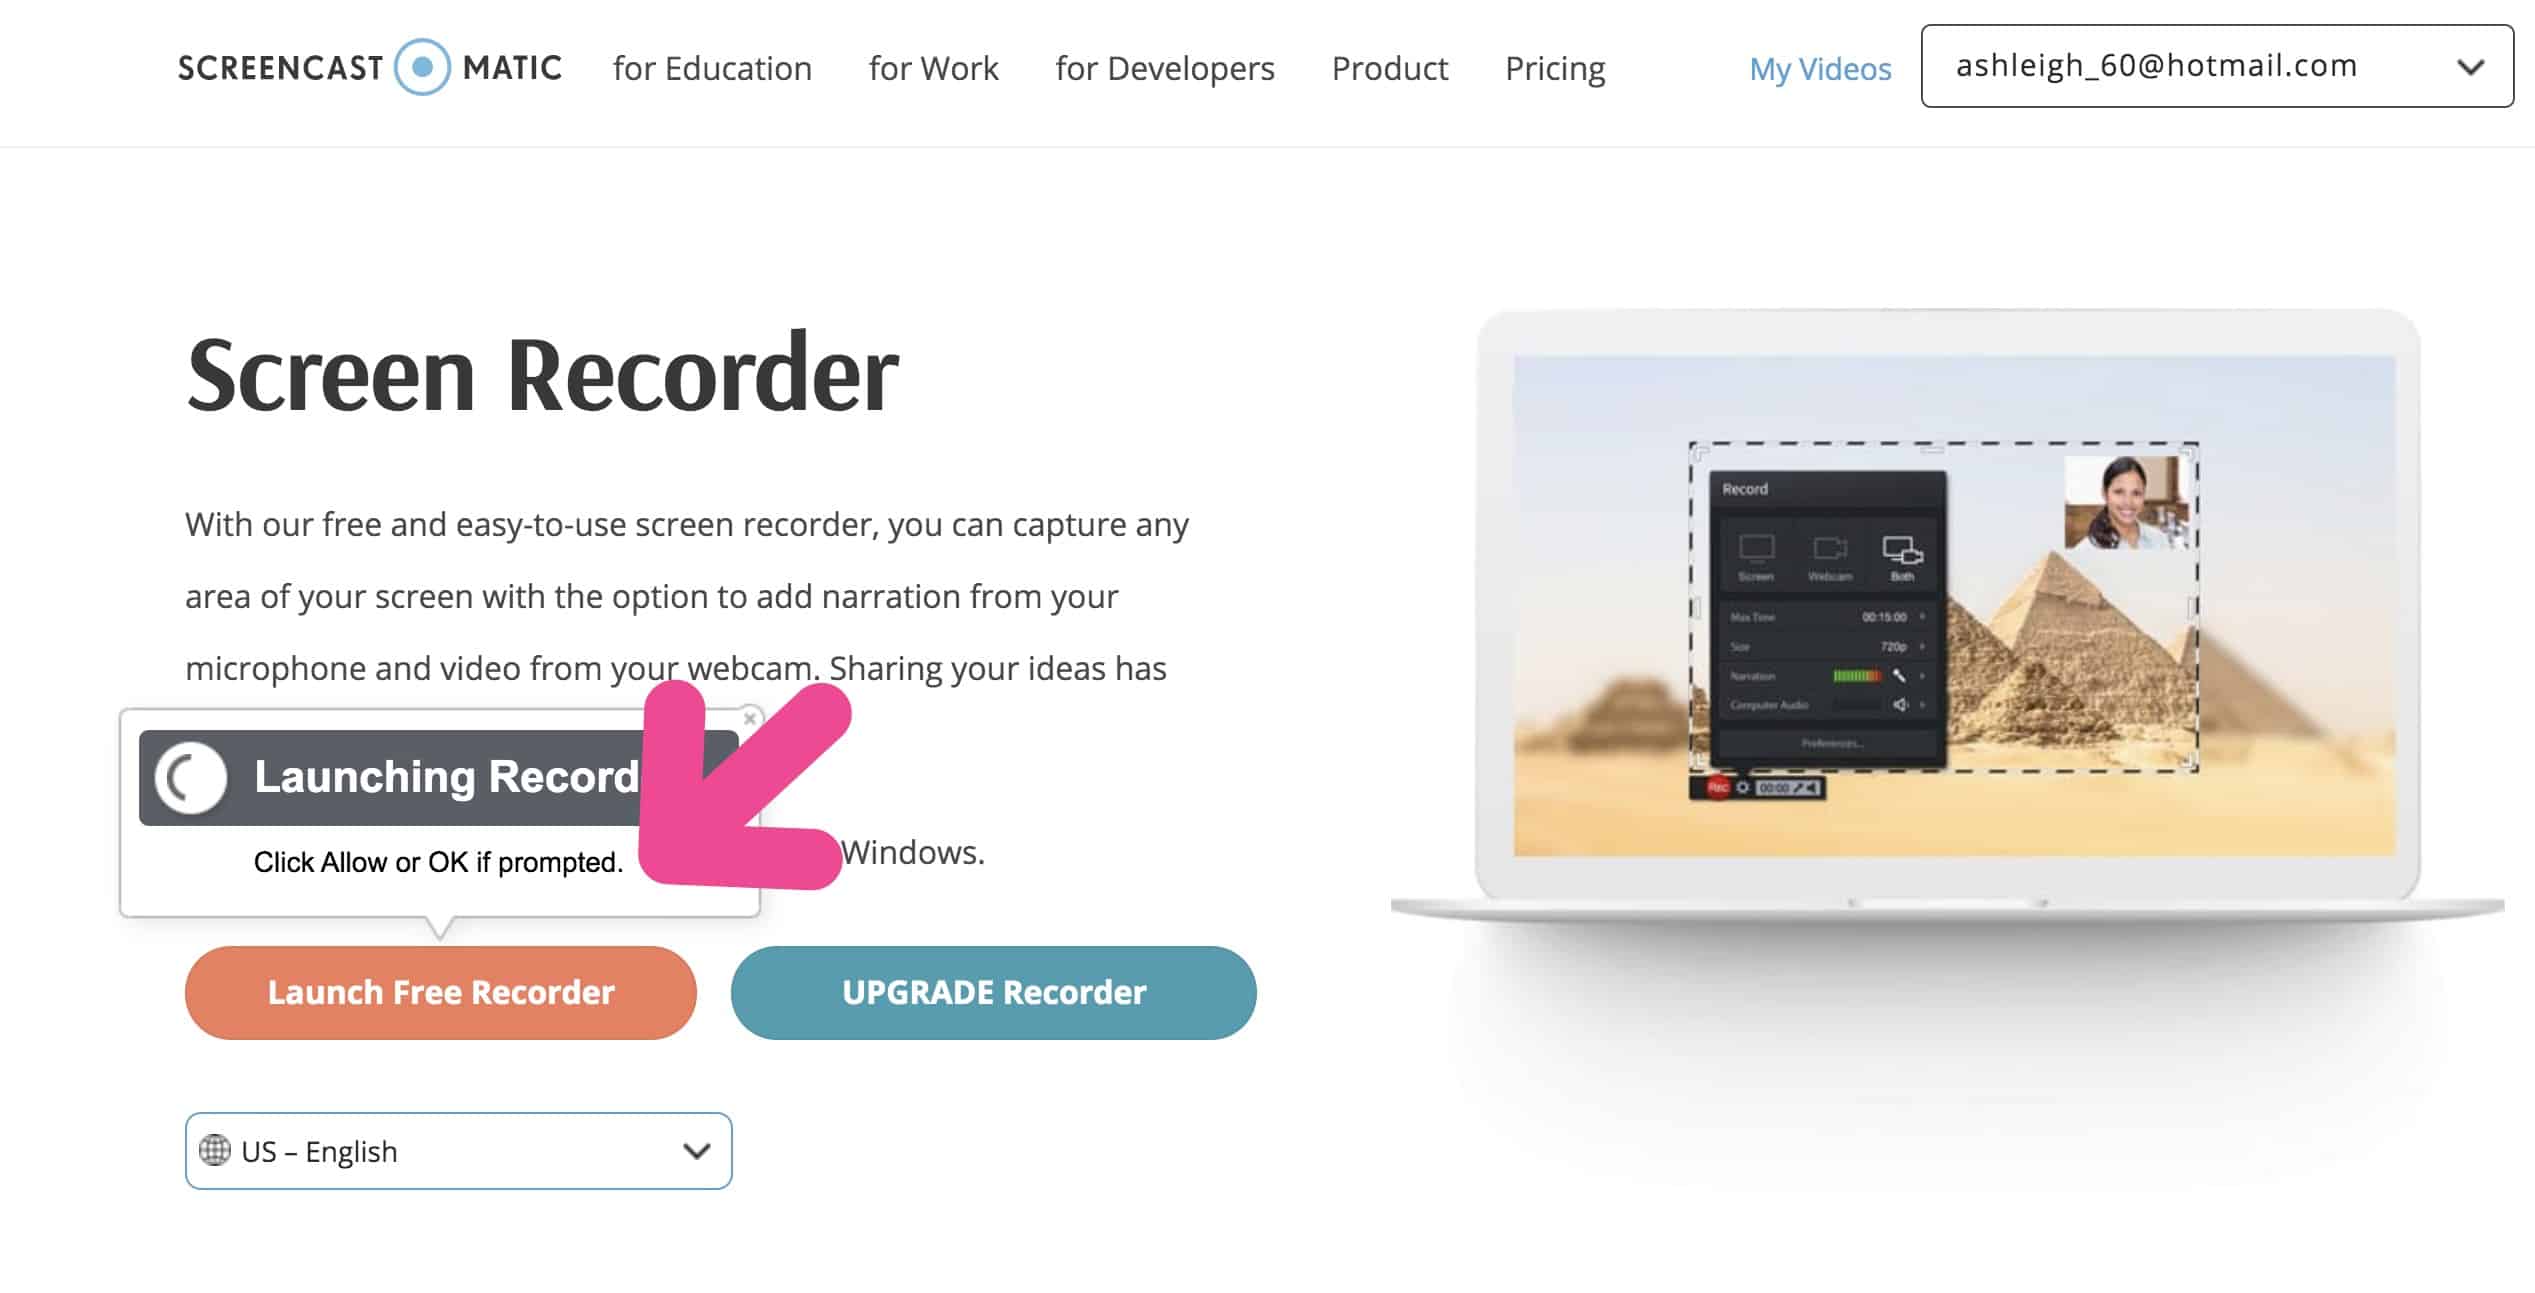
A dotted box will pop-up. Adjust the size of the frame so that anything that happens in the frame will be recorded. You can also select if you want to record your screen only, yourself only, or both.
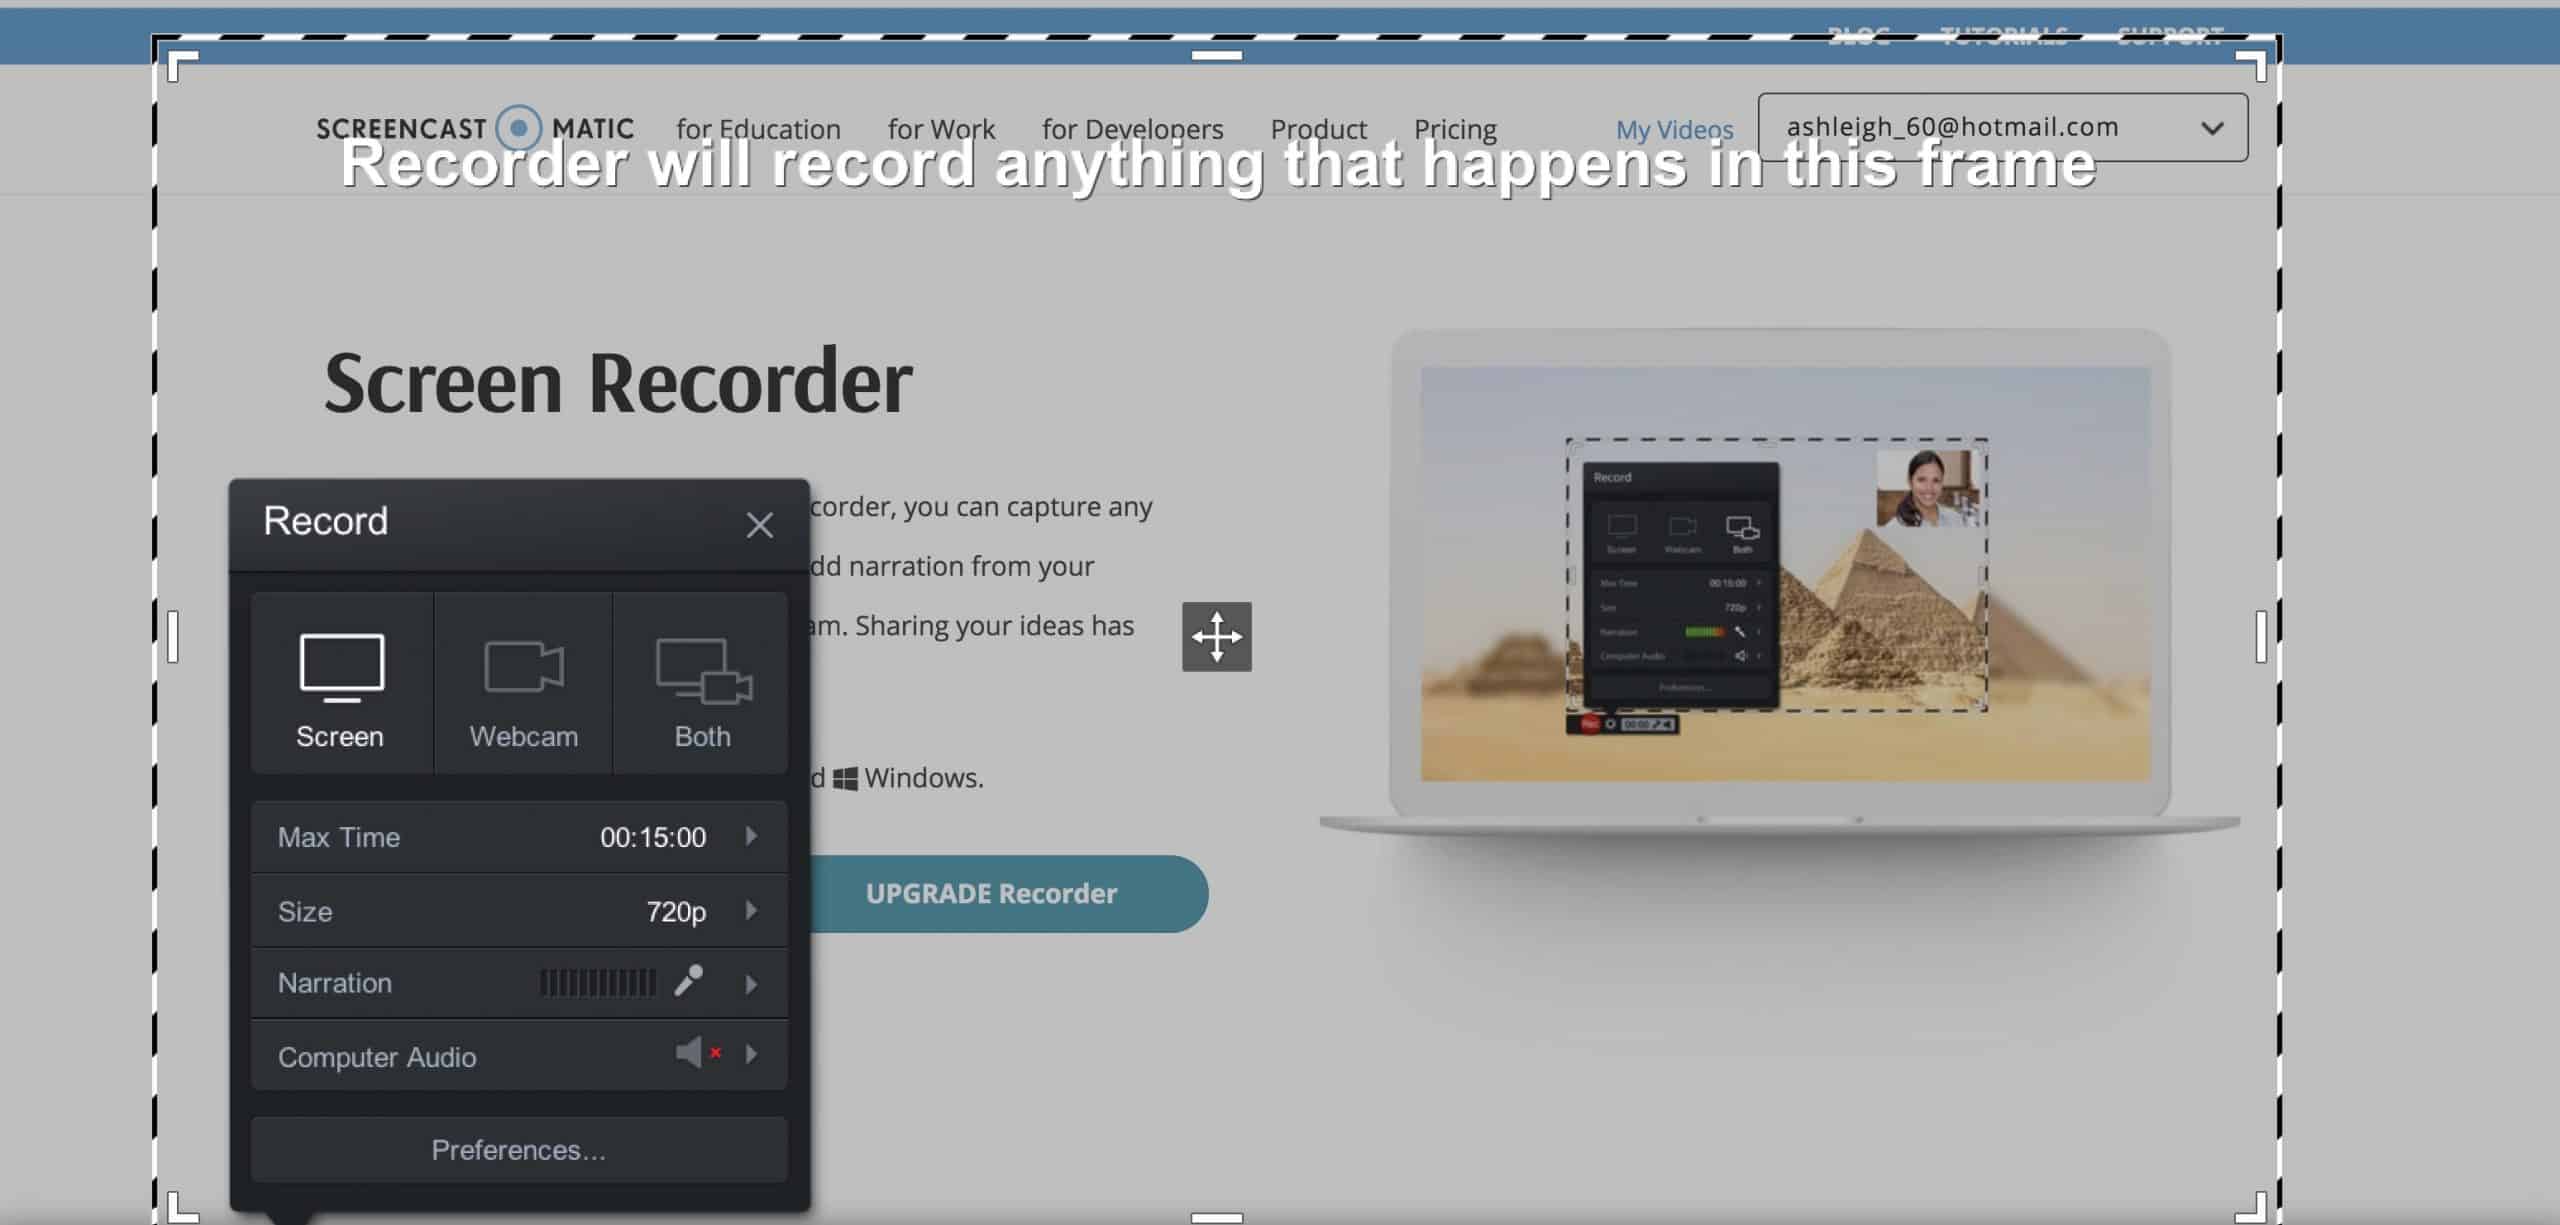
That’s it! Seriously! I never would have imagined recording a video for students could be so easy. Plus, I can do this in my pajamas!
If you upgrade, there are many editing options. However for now, I plan to keep it simple.
I have one last thing! I know many teachers need to quick print a collection of resources for students for distance learning, so I’ve combined samples from some of my favorite TpT products to share with you for FREE! You can download them below.
It gives me an error message when I try to access the Google Form. It says resource unavailable”
It should be working now.
Hi there I tried to download the technology survey, but when I tried it said I didn’t have access. Can you help me out with that?
erica.degrote@juneauschools.org
It should be working now!
How do we sign up for free Brainpop?
Thanks for the tutorial on Zoom. I’ve been hearing about this for the past week and wanted to see how it works. Looks easy enough, even for someone who’s technologically challenged (like me!). I think this will create some new ways of connecting with students even after we return to school. Hang in there!
Zoom is so great- just make sure your district or school allows you to use it to interact with students first. I teach in Upstate NY and we have a law called “Ed-Law 2D” which very strictly limits what programs and online platforms we can use as some of them, while they may be FERPA compliant, don’t meet our state education guidelines. I’m not sure if this is the case for other states, but I wanted to share just in case so that no one gets in trouble!
We here is art? The one subject that integrates with everything.
Reading Theory is difficult to access due to tech issues. Hopefully they’ll fix their glitches. :o(